Showing posts with label Music Tools. Show all posts

2012/06/01

Monster Beats Pro by Dr. Dre Headphones


Leave your preconceptions at the door—these aren’t just headphones for hip-hop


$449.95 MSRP, $399.95 street

www.monsterproducts.com


by Craig Anderton

There’s no doubt that headphones are in the spotlight, and by enlisting Dr. Dre as a reality check, Monster was the first to take headphones out of the realm of the utilitarian to something with a bit more panache. While the Beats Pro phones aren’t quite the “headphones as fashion statement” products we’re seeing today (primarily for DJs), they hit the “sweet spot” between hi-fi and hi-fly, and are available in black or white.

I hadn’t had much experience with Monster headphones until I checked out their Turbine Pro “in-ear speakers.” I took them with me on a trip to Europe during which I needed to do some mixing for video soundtracks, so I used the Turbines with the anticipation they’d get me in the ballpark, and I’d tweak the mix when I got home and listened on “real” speakers. I was very much taken aback when I didn’t have to change a thing—the mixes sounded just like they did on the Turbines. The Turbines also exhibit truly exceptional transient response finesse, and they’ve become a permanent part of my travel bag. If nothing else, airplane movies never sounded so good (nor has my MP3 player).

So would Monster’s headphones stand up to scrutiny too? Time to find out.


LOOK AND FEEL


The first impression is the packaging, which is substantial. There’s the headphones, a detachable cable with locking connector you can plug into either earcup (the two connectors are in parallel, so someone can plug a second set of headphones into yours), and carrying pouch. The headphones use aluminum construction, which aside from being sturdy also looks very classy, and the cable has a coiled end that allows extending it to over six feet.

The ear cushions are downright sensual—soft, smooth, and washable. They provide excellent isolation through natural means (i.e., no noise-canceling technology), and vocalists will appreciate that you can rotate one earcup so you can sing with one earcup off, yet the headphone still hugs your head, and the other earcup stays exactly where it should. Perhaps that’s a small feature, but once you experience it, you’ll wish all headphones could do the same thing. This also makes it easy to fold the phones up for transport. I suspect the tight coupling of earcup to ear also accounts for why the bass is so solid—more on this later.

However the earcups are circular, not oval, and smaller than some headphones. I found them acceptably comfortable, but if my ears were much larger or my head shaped differently, I’m not so sure I’d be happy with the comfort level. Try on a pair before you buy; if you’re good with them after ten minutes, I’m pretty sure you’ll be good with them for extended listening. Another potential “gotcha” is that the cable is very cool in how it locks into the headphones, but it’s non-standard. It’s probably a good idea to pick up a spare, just in case.


GIVE ME A BREAK?


Call me crazy, but I think these need to be broken in. Although I have no way of replicating my experience with a controlled experiment, it sure seemed like there was a “bump” around 2.7kHz when I first tried the phones. I compared the Beats Pro to several other phones, and found that if I broadly notched out a bit of the response around 2.7kHz, the upper mids evened out compared to the others. Okay . . . it certainly wasn’t the first time I’d heard phones with a little lift here or there.

Then several hours later, the headphones seemed to lose a little definition in the upper mids. I reduced the EQ, and all was well again. I again compared the Beats Pro to other phones, and now the bump seemed somewhat less. The only variable was time; the music, headphone amp, everything else was the same.  The only conclusion I can come to is that they need a break-in period, because they’ve sounded the same ever since—there’s still a little bump around 2.7kHz, but it sure seems like considerably less than it was originally, and what is there may be on purpose to give a little more definition for vocals.


COMPARISONS


While well-constructed, stylish, functional headphones are a plus, ultimately it’s the sound that matters and all headphones have their own special characteristics. I have several “favorite” headphones, and started the comparison process with an Audio-Technica ATH-M50 (at $199 list and $159 street, my first choice for “bang for the buck”), AKG K271 Mk II ($299 MSRP, $249 street—a solid all-around set of headphones), AKG K702 ($539 MSRP, $349 street with a high-end, accurate, non-hyped sound), and Ultrasone Pro 750 ($409 MSRP, $389 street and known for its distinctive high end).

Compared to all the phones, the Beats Pro had the most even and tightest low end—if you want to know what’s going on with your bass and kick, look no further. Over-ear headphones naturally give good bass because of the coupling to the ear, but I played one track that had a descending low frequency sine wave, and there were no “holes” in the slide. Kicks gain a real thump, but it’s not hyped; the sound is more like speakers with a solid low end than what you’d expect from headphones. Fortunately, it’s not mushy, nor does it overpower the highs or unbalance the sound. These are also pretty sensitive, high-output phones.

Compared to the ATH-M50, the biggest difference was the low end, and the Beats Pro’s even response throughout the spectrum. Still, the comparison reminded me why I consider the ATH-M50 to be good value for money. The K271 Mk II was more comfortable but bass-shy; pressing the earcups more tightly against my head improved the bass, but it still wasn’t in the same league as the Beats Pro. One aspect where the K271 Mk II had an edge was in high-frequency “airiness”—which seems to be an AKG specialty—but its overall sound was a little boxier than the Beats Pro, due to the lesser low end.

The K702 is a different type of design. It’s low sensitivity, accurate, extremely comfortable, and doesn’t isolate very much. Although it too lacked the Beats Pro’s authoritative low end, in terms of balance, clarity, and accuracy the K702 gives an excellent account of itself. However, vocalists will find the lack of isolation problematic if they listen at high volume or keep an earcup off the ear, and the Beats Pro have a certain “personality” that’s warmer than the K702. Bottom line is they’re both excellent headphones, but if I had to make an analogy, I’d expect to see the K702 in a post-production suite and the Beats Pro in a recording studio.

As to the Ultrasone, it’s apples and oranges. Ultrasones have a “sound” that involves a unique approach to high-frequency imaging and clarity, but they’re quite bass-light. They’re almost like polar opposites: someone who loves Ultrasones probably wouldn’t like the Beats Pro, and vice-versa.


OVERALL


Once you get acclimated to the excellent construction, design, and fashion sense, what stands out the most for me is the low end. But I need to emphasize it’s not hyped—it’s not like someone turned up the bass compared to other phones, but instead put the bass back in that would otherwise be missing. Hyped bass sounds mushy to me, but this is tight. You really hear the attacks on bass, and the kick has a visceral character compared to standard phones—it’s more like the visceral feel you get from speakers, which is extremely difficult to pull off with headphones. Beats Pro manages to do that.


I wouldn’t classify the highs as “airy,” but rather as defined and non-fatiguing. Even after the break-in period, here’s still that slight upper mid lift—although nowhere near as much as, say, Sony’s MDR headphones. In some ways, this has an advantage: If you mix so as to accommodate the bump, your mix will avoid any whiff of “screechiness.” And for DJing, the slight midrange lift helps give more intelligibility in bass-heavy music. Add that to the excellent isolation, and you basically have hi-fi phones for DJing.

About the only caution would be the comfort factor. I didn’t have a problem wearing the Beats Pro for an extended period of time, and I’m not a little guy; but this is a try-before-you-buy situation, as one size does not always fit all.

If I had to describe the Beats Pro in one word, it would be satisfying. The balance from low to high is excellent, with an even, realistic sound that I can’t help but keep comparing to listening to music on speakers. And don’t let the Dr. Dre connection throw you: These aren’t “hip-hop headphones” but are excellent for metal, rock with a decent bass component, and any kind of dance music. The biggest surprise was classical music. I played back some classical nylon string guitar and harpsichord albums I’d engineered and mixed, so I knew the sound of the instruments both in terms of how they sounded acoustically in the studio, and over excellent monitors. They acquired a big, detailed vibe that was slightly larger-than-life and ... well, satisfying.

I’m very impressed with the Beats Pro, not just because they’re good, but because they were more general-purpose, more stylish, and paid more attention to detail than I expected. They’re not cheap, but then again—they’re not cheap.


--------------------------------------------------------------------------------------------------
Liked this? Then Please share this page on Twitter (by clicking on the “Tweet” button) and subscribe to get the top stories of the week, plus the most popular reviews delivered straight to your inbox.

And don’t forget to give us your suggestions in the comments!


View the original article here

TASCAM DR-680 Portable Multitrack Recorder


It's definitely more than just a field recorder...

$1,399.99 MSRP, $809 streetwww.tascam.com


by Craig Anderton


Portable recording has come a long way. There are now a zillion inexpensive, portable stereo recorders, with enough choices to cover you whether your needs are long battery life, small size, bells and whistles, storage capacity, musician-oriented features, or various combinations thereof.

But if you want to go portable multitrack for serious production work – anything from recording a live concert, to doing location sound, to field recordings – the story changes. You can use a laptop, carry some kind of interface, and hope your hard drive and the computer fan don’t make too much noise. Or you can use a stand-alone hard disk recorder, or all-in-one studio. Or, you can check out TASCAM’s DR-680, which is an elegant, and surprisingly full-featured, option for 8-track portable recording that can also occupy a useful place in your regular studio. It can run off eight AA batteries (with approximately four hours recording time) or the included AC adapter, and is compact enough to carry around with you – dimensions are 7.95"W x 2.12"H x 6.93"D, and it weighs 2.65 lbs. without batteries.


The battery compartment on the DR-680’s underside is readily accessible, so you can change batteries within seconds (click to enlarge).


THE MEDIA IS THE MESSAGE


Nope, no hard drive; recording is to SD or SDHC cards, formatted to FAT16 (or FAT32 for cards larger than 4GB). This means you can pop the card into a computer’s card reader when you want to transfer files (you can also do so via USB 2.0).


Pulling back a protective rubber cover reveals the SD card slot and mini-USB 2.0 connector. Also note the Kensington security lock option, and the jack for the included AC adapter (click to enlarge).

WAV or BWF recording (BWF embeds time-of-day data into the recording - not quite the same as SMPTE, but knowing when a take was recorded can be helpful)  is 16- or 24-bit, 44.1/48/96/192kHz. There’s no 88.2kHz sampling rate – a curious omission – but today’s sample rate converters are up to the task of downsampling 96kHz to 44.1kHz if you’re planning to make a CD. However, note that you’re limited to stereo recording/playback at 192kHz. I’m not a  huge fan of anything higher than 96kHz, but I assume that TASCAM wanted  to add an “archiving” type of option.

You can record 8 simultaneous tracks (other than at 192kHz), but there are different ways to use these eight tracks, and it took me a while to wrap my head around them. One option is to record the six analog ins and the digital in (via an RCA connector that automatically senses S/PDIF or AES/EBU format) to yield six individual tracks and a stereo track pair. Of course, this assumes you have a stereo signal source that can connect to the digital input. Another is to record six analog ins as mono tracks, and use the stereo track to record a mix of these inputs (with level and pan). Yet another option is to record four pairs of stereo tracks – 1-2, 3-4, 5-6, and the digital in.

These also interact with the “record format” options. The mono format is most like conventional multitrack recording, where each track stores a mono signal. The stereo format creates a stereo file for each track pair. The final mode, 6ch, records a six-channel file for tracks 1-6. In case you’re thinking “Hey, this would work for location surround recording,” you’d be right.

If you want to record for a really long time, you can also record up to four MP3 tracks at 96/128/192/320kbps (four individual tracks, or two individual tracks and a stereo mix). However, unless you really have recording time issues, it’s worth going with WAV or BWF files. For example, with a 32GB card you can record almost four hours with eight tracks at 24/96, or 12.5 hours with eight tracks at 16/44. On the other hand with MP3, four tracks and 320kbps resolution, you can record for 111 hours – that should pretty much cover any hardcore rave you might ever attend. At the other end of the resolution scale, you could record 7.75 hours of stereo material at 24/192.

One other aspect of recording to a card: The DR-680 makes no noise. None. There’s no fan, no whirring hard drive, nothing. The only clue it’s on is the bright orange backlighting on the display.


The 128 x 64 pixel backlit display is informative, and easy to read under bright or dark lighting (click to enlarge).


GOZINDAS AND GOZOUTAS


The analog ins are all along the unit’s left side. There are four XLR+1/4” balanced combination jacks, and two TRS 1/4” jacks.


All analog ins are grouped together on the DR-680’s side (click to enlarge).

You have a fair amount of control over each input. All six jacks are switchable between mic and line, with switchable phantom power available for input pairs (1-2, 3-4, 5-6 - yes, that includes the TRS ins). I measured phantom power as 47.1V, so this is not one of those portable units that “gets by” with a lower voltage. There are no physical gain controls for the inputs, but each input has a high-gain/low-gain switch that comes into play when the input is set to mic, and you can also trim levels electronically, as shown on the display.


A bunch of switches on the top of the DR-680 set input characteristics for the six analog inputs (click to enlarge).

The six line outs - unbalanced, RCA connectors – are located on the right side, opposite the input connectors. These not only carry output signals when playing back, but are “thru” connections for the inputs when recording. This is also where you’ll find the S/PDIF-AES/EBU I/O, and the cutout for the card slot and USB connector. Other outputs include a front-panel headphone jack with volume control, and – surprise – a small built-in mono speaker for “instant monitoring.”


The analog outs and S/PDIF I/O are located opposite to the input connectors (click to enlarge).

However, I also wanted to show a close-up of these output jacks because this lets you see the screws holding the jackplates in place (there are equivalent screws on the input jacks). This isn’t one of those units where they mount on the jacks on a circuit board, then have the jacks poke through a hole in the case – these babies are secure, and you could plug and unplug jacks all day long without worrying about compromising the jack mountings. This is probably something most people wouldn’t notice, but I did, so kudos to TASCAM for spending the extra few bucks needed to make the unit more reliable.


Those little screws nested in the jack field may not look important, but they indicate a degree of sturdiness that’s welcome for a portable unit (click to enlarge).

Further evidence of solid construction came courtesy of UPS. When I unpacked the unit, the data wheel ring had worked loose from the unit. My initial reaction was a diss of TASCAM’s quality control, because really, there’s no excuse to have a knob fall off. So I snapped it back in place, and that’s when I noticed it was almost impossible to get it back off again. The DR-680 must have taken a massive shock or drop on the way here to knock that ring out of place, yet the unit still worked perfectly. Frankly, that’s impressive.


DIGGING DEEPER


If what we described so far was all there was – input, output, display, and navigation – you’d have a pretty cool recorder. But dig into the menu, and you’ll find some extra goodies.

You can enable a limiter for each analog input, which is the kind of feature that can save a recording and therefore gets a major thumbs-up. Also, just in case your mics don’t have low cut filters, you can choose a low cut filter at 40, 80, or 120Hz for each input. With location recording, this is useful for minimizing wind and air noise, although it’s not a substitute for adding proper acoustical filtering at the mics themselves.

Some features scream “portable recorder.” One is a 2-second pre-record buffer that’s always recording, so if you hit record a second late – no problem. I don’t understand why the default for this is “off,” but it’s easy enough to turn it on. Another is trigger-based recording, where you can specify recording to begin only when a certain level is exceeded. These two work together, because when the sound is triggered, you still have the record buffer to draw from to guarantee you didn’t miss some kind of initial transient. It’s also easy to insert markers so you can quickly locate particular takes, and you can initiate a new take at any time, even in the middle of recording, and continue within the same take when re-starting a recording (or create a new take). For a field recording situation where you may be recording something like different takes of dialog, being able to identify and name takes comes in handy when you get back to your post-production facility. Couple this with the ability to organize takes in folders, and you have a recording medium that makes it easier to find the material you want.

As noted previously, there’s even a basic mixer built in with level and pan controls. And if you need more tracks, it’s possible to cascade two units and control both of them from one one transport. Although they don't share word clock, if you're willing to give up a S/PDIF in you can at least sync the slave to the master S/PDIF clock. And speaking of control, the navigation/transport section is obvious, and you can even do scrubbing with the data wheel.


The transport and navigation controls are what you’d expect from a multitrack recorder (click to enlarge).


CONCLUSIONS


Of course, there are more details like file and folder operations, naming takes based on the time or key words, and typical front panel controls like solo, record, and pause.


You can access the most-needed controls for real-time operation from the front panel (click to enlarge).

We haven’t gone into much detail about USB file transfers because they’re totally standard – the DR-680 appears to the computer as an external drive, and you can drag and drop files to and from the computer.

So, any complaints? Well, I wasn’t too thrilled to see RCA audio output jacks until I realized that the DR-680 is primarily a capture medium, and TASCAM put the bucks where it’s most important. In most cases you’d be pulling files out of the DR-680 for editing or duplication, but nonetheless, the unbalanced output sound quality is fine as is.

Oddly for TASCAM, the unit doesn’t come with an SD card, unlike most of their portable recorders. But thinking about for a bit, a multitrack unit really wants a high-capacity card, not the usual 1 or 2GB card found in a typical stereo recorder – and a 16 or 32GB card isn’t exactly a throw-away item you could bundle in without raising the price. (Also note there’s no internal memory, so you have to use a card.) There are no internal mics; I think TASCAM expects you to use higher-quality, external mics but if there was an internal mic you could use the DR-680 as an “instant scratchpad.” Finally, given that there’s USB 2.0, some might wonder why the DR-680 doesn’t include at least primitive audio interface capabilities.

But really, none of those are deal-breakers or for that matter, “deal-benders.” Even the documentation (which you can download) is clear and complete, and despite being sturdy, the unit is very portable. There's even the optional-at-extra-cost CS-DR680 soft case to help protect the DR-680 from the rigors of the road, and Portabrace offers the AR-DR680 if you need something waterproofed and with optional pouches to carry more stuff. (Of course, you could always just carve out the foam insides of an attache case to make room for mics, the AC adapter, and some spare batteries.) What's more, there have been recent updates; now the DR-680 can do recording with mid-side decoding. The updating procedure simply involves downloading a small firmware file, copying it to the DR-680, and following instructions on how to load the firmware.

Overall, I must say the DR-680 surprised me. If this had been around when Nagra field recorders ruled the world, they wouldn’t have ruled the world much longer. However, field recording is a pretty esoteric field (no pun intended) and if people think of the DR-680 solely as something for recording dialog or effects in the middle of nowhere, that misses out on a lot of the unit’s potential.

For example, while pocket stereo recorders are useful for recording a band, with the DR-680 you could feed a stereo monitor mix from the PA without the singer to the stereo track, feed the lead singer's mic into a separate input in case something needs to be re-cut later in the studio (I won’t tell it’s not 100% live), and you could even add a couple mics to pick up the audience applause. For small jazz and classical ensembles, having six mic ins may be all you need – ditto theater groups. And of course, this isn’t only a recorder, but a multitrack playback unit as well. For solo musicians who need a “backing track” machine, theater groups that need to play back sound effects, or a dance company that wants to play back music in surround, the DR-680 is compact, offers excellent fidelity and ease of use, and apparently, you can beat it up and it will still survive if my UPS experience is any indication.

Looking at all these applications makes the DR-680 far more desirable than being “just a field recorder,” but the price is right, too. With the current street price hovering just over $800, that’s a lot of value. Those who are willing to spend a few hundred dollars for a quality portable stereo recorder should consider the pros and cons of stretching the extra bucks to go multitrack; it only takes a few live recording situations to demonstrate the usefulness of multitrack portable recording.


--------------------------------------------------------------------------------------------------
Liked this? Then Please share this page on Twitter (by clicking on the “Tweet” button) and subscribe to get the top stories of the week, plus the most popular reviews delivered straight to your inbox.

And don’t forget to give us your suggestions in the comments!


View the original article here

PRX400 series now available from JBL


Press Release: Designed to bring true professional-quality performance, power handling and durability to more affordable price points, the series includes the 15-inch PRX415M, 12-inch PRX412M and dual 15-inch PRX425 loudspeakers, as well as the 18-inch PRX418 subwoofer.

All models incorporate JBL's Sonic Guard speaker protection.

In common with all JBL Professional products, PRX400 Series loudspeakers have survived JBL's 100-hour power test, in which they are submitted to 100 hours of continuous, high-level input. The speakers also go through a barrage of unforgiving environmental and strength tests including harsh temperatures and humidity, ensuring they will perform perfectly anywhere.

All PRX400 models incorporate JBL's Sonic Guard speaker protection circuit that automatically attenuates the signal going into the high-frequency section of the speaker if too much input signal is detected, and restores normal operation when the overload condition passes.JBL PRX400 loudspeakers are designed to work hand in hand with Crown Audio's powerful and innovative XLS DriveCore and XTi2 Series amplifiers.

Crown XTi2 amplifiers incorporate enhanced pre-set performance tunings for PRX400 Series loudspeakers, including crossover points for a sat/subwoofer setup, and optimized parametric filter that bring out the full potential of PRX400 Series loudspeakers. JBL PRX400 tunings will also be available in the dbx DriveRack PA+ signal processor/complete loudspeaker management system.

The PRX400 series is available now with prices starting at £585 RRP ex VAT.
For more information, be sure to head to www.soundtech.co.uk/jbl.


--------------------------------------------------------------------------------------------------
Liked this? Then Please share this page on Twitter (by clicking on the “Tweet” button) and subscribe to get the top stories of the week, plus the most popular reviews delivered straight to your inbox.

And don’t forget to give us your suggestions in the comments!


View the original article here

2012/02/07

Taylor GS Mini

Travel sized acoustic guitar with full sized playability and a surprisingly big voice
http://www.taylorguitars.com/guitars/acoustic/gs-mini
$679.00 MSRP, $499 "street"


By Phil O'Keefe

Travel guitars are an interesting, if somewhat niche product. They allow many guitarists the ability to take a guitar with them in situations where a full-sized instrument might be too cumbersome or obtrusive, but their playability is often a bit of a compromise due to very short scale lengths and narrow fingerboards, and their small bodies often produce less than inspiring sound quality. However, many musicians are willing to tolerate these shortcomings simply because they have had little choice -- when traveling, a compact sized instrument is easier to take along; you could have big sound, or a small instrument, and you couldn't really get both -- until now.


Figure 1: The Taylor GS Mini (click on images to enlarge)

Taylor is no stranger to travel guitars. Their own Baby Taylor model has been a big success and a part of their product line since 1996, and for the past few years, I myself have been fond of keeping one handy when working in the studio -- not only for it's own unique and slightly quirky recorded timbre, but also as a guitar I can grab and use to quickly demonstrate musical ideas and suggestions to other musicians. As handy and as useful as the Baby has been, it does have some limitations; most noticeably, it doesn't offer the volume and projection of a full sized instrument, nor anywhere near the full range frequency response of a large guitar. Taylor took the features that made the Baby so popular and expanded on them with the GS Mini, with the intention of creating a guitar that could serve equally well as a travel companion or modern-day parlor guitar for use around the house. Based on my experiences with the review unit, I'd say they nailed those goals.


CONSTRUCTION AND MATERIALS

The GS Mini is a classy looking little guitar, with a definite Taylor vibe to the aesthetics. The solid sitka spruce top has a satin varnish finish and is bordered by black / white / black purfling around the edges, which matches nicely with the black and white three-ring rosette around the full-sized 4" soundhole. A tortoise pickguard with a familiar Taylor styled shape is also included, and like the Baby, the GS Mini has a black Lexan laminate on the front of the traditional Taylor shaped headstock, with the Taylor logo displayed at the top. The truss rod adjustment is also located at the headstock, and is hidden under a black plastic cover. The black headstock face visually ties in nicely with the GS Mini's ebony fingerboard and bridge.

The two piece, bookmatched solid sitka spruce top has some dark figuring here and there in the wood - it's not as even in color as the spruce on some of Taylor's high-end models, but the bookmatching means the patterning is uniform, and while looks are subjective, I thought it gave the guitar some unique and individual visual appeal. (Figure 2) The top is X braced, and careful examination of the interior with a light and a dental mirror revealed scalloped braces and clean construction, with no unexpected gaps or globs of glue.

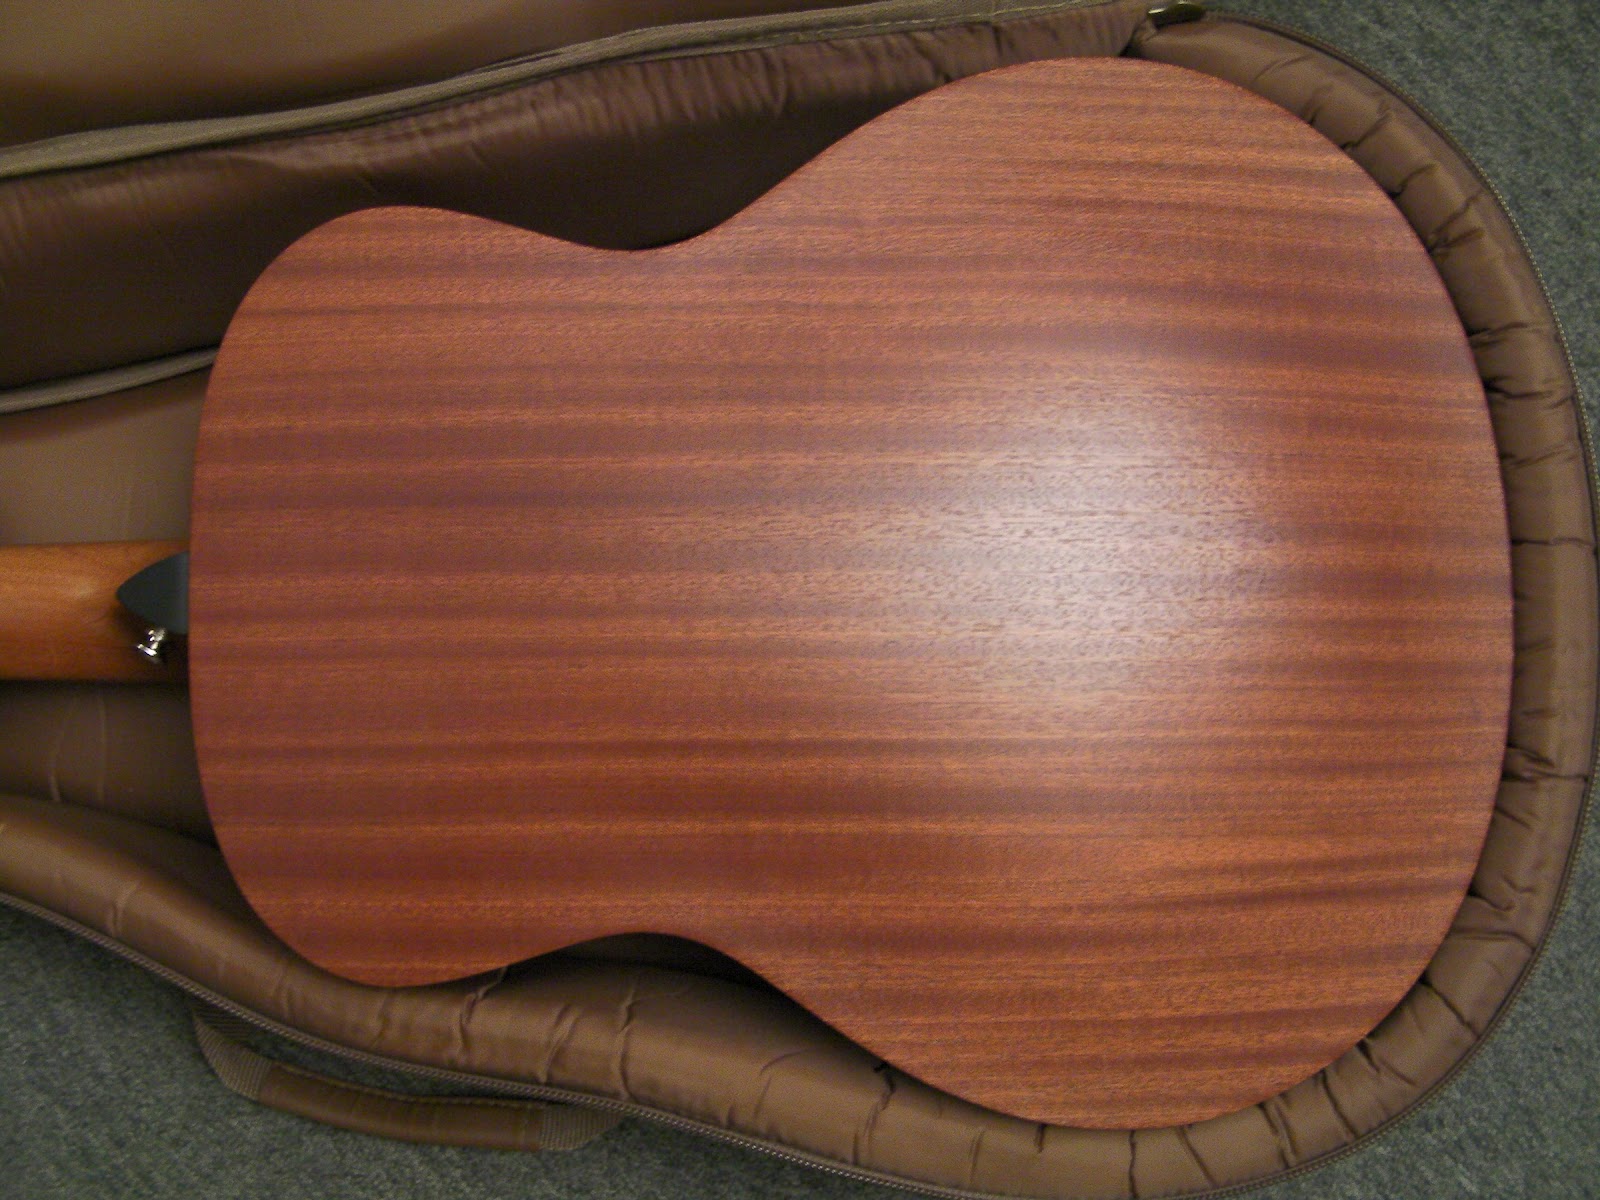
The body is a scaled down version of Taylor's own GS, or Grand Symphony body style. There is some open-pore grain texture to the satin varnish finished African sapele laminate back and sides. The back is arched and braceless. The body wood has some striping to it -- areas where the shading is subtly darker and lighter; similar to figured maple, but with much wider bands. (Figure 3) The appearance is not unlike the highly figured American mahogany on my Taylor 510, and the similarities go beyond the cosmetic - the overall tone of sapele is also very close to mahogany, although with a touch of added "zing" to the highs, in a manner similar to maple. The resulting tone of the GS Mini has a bit of midrange emphasis, and is articulate and bright in the treble, with excellent note definition. The full depth (4.5") body and full-sized sound hole gives it a bigger, deeper bass tone than the small body length and width would lead you to believe, but it lacks the beefy wallop of a full sized jumbo or dreadnought. Still, I was pleasantly surprised by just how full the bass is. There's a brilliance to the bass notes that really speaks nicely on bass register runs and alternating bass accompaniment.

The slightly open grained satin texture extends to the solid sapele neck, although it doesn't affect the smooth feel or playability, which I would describe as being very fast and nearly effortless. Taylor's patented NT Neck supports the fingerboard even in the area over the guitar's top, and allows for easy adjustability of the neck angle, and even eases neck resetting and replacement if the need arises. Neck width at the nut is 1 11/16" which is a fairly standard size. I didn't feel like my fingers were cramped into a overly narrow fingerboard. This is important, because in conjunction with a shorter scale length, a too-narrow fingerboard can lead to playing difficulties. Thankfully, Taylor kept the fretboard width full-sized. The nut and compensated bridge saddle are made out of NuBone, a synthetic material from GraphTech. NuBone is a derivative of their proprietary TUSQ man-made "ivory" material, with similar tonal properties.The sealed tuning machines bear no branding marks, but have a similar look and feel to some of Schaller's tuners. Regardless of who makes them, they feel very smooth and held their tuning just fine.


Figure 2: The review unit's bookmatched Sitka Spruce top


Figure 3: The laminated Sapele back and sides are nicely figured. Note the thickness of the padding on the included "hard bag"


PLAYABILITY AND SOUND

Let's get right down to it -- the GS Mini plays, responds and sounds far more like a "real" acoustic" than a "travel guitar." Compared to the Baby Taylor (Figure 4), the GS Mini is capable of getting quite a bit louder, and can easily hang with full sized instruments at informal jam sessions in the backyard or living room without compressing and bottoming out. In fact, the guitar is surprisingly touch sensitive, and responds equally well to being played with gusto as much as it does to being delicately caressed. This outstanding dynamic response is fairly uncommon in smaller guitars, and is a big part of the Taylor's appeal from a playability standpoint.

The shorter 23.5" scale length feels compact, but not nearly as closely spaced as the 22.75" scale of the Baby Taylor models. The stock strings are also heavier; a medium gauge set of Elixir Nanowebs. While this may be heavier than many players are used to using, the feel is offset by the lower tension of the short 23.5" scale length. Coupled with the comfortable neck, the feel is surprisingly "electric" and extremely easy to play, inviting you to explore the entire length of the fingerboard. The big strings under lower short scale tension also helps add fullness and warmth to the tone. The guitar arrived tuned to standard E tuning straight out of the box, and unlike some acoustic guitars, is designed to handle standard tuning with medium gauge strings without risk of damage. The action is exceptional. It's low and consistent up and down the entire length of the neck. Electric players should feel quite at home on it, and the fast neck makes this a good choice for a backstage / dressing room warm-up guitar. Of course, the small size will also work well in cramped tour bus quarters too.

The guitar works equally well when played with a flatpick or fingerstyle. The voice is crisp and clear, with fullness in the bottom but no boominess or mud. The dynamic response to changes in the force of the player's touch is outstanding, and it's really easy to go from soft and delicate tones to a shockingly loud full volume roar when strummed or plucked hard. There doesn't seem to be nearly the same degree of compression and volume limiting when the guitar is driven hard - unlike many small bodied travel guitars. While the sound lacks the booming bass of a full-sized dreadnought or jumbo bodied guitar, there is a lot more fullness to the sound than you might expect based solely on its relatively small dimensions. Taylor attributes this to the larger soundhole and deeper, full-sized body depth. Whatever the reasons, many players are pleasantly surprised by the tonal balance when they first play a GS Mini. To capture that sound when recording, I found that traditional mic techniques, such as a condenser at the 14th fret, worked well, but I felt I had the best results with a good pair of small diaphragm condensers in an XY stereo setup placed about 8 - 12" directly in front of the soundhole.


Figure 4: A size comparison -- the GS Mini, a Taylor 510 Dreadnought, and a Baby Taylor


OPTIONS AND ACCESSORIES

The GS Mini was designed to accept the optional ES-Go pickup. This is a magnetic stacked coil humbucking pickup that "floats" at the front of the soundhole without actually coming into contact with the top. According to Taylor, it can be easily installed by the guitar's owner using factory-installed fixtures inside the GS Mini. All of the mounting clips are already pre-installed, and adding the ES-Go requires only a few minutes and a small screwdriver. When coupled with Taylor's V-Cable, which incorporates a built-in volume control into a right-angle 1/4" plug, this gives the player a built-in pickup and a volume control at the output jack, which is located at the rear strap button. Unfortunately, I was unable to test these as part of this review (although I hope to do so in a separate review in the near future), but with even a casual look inside the GS Mini it's easy to see the mounting clip for the optional pickup and the tie-down points for the interior wiring.

One thing that isn't optional is the case. The included "hard bag" is stiffer than many gig bags, and nicely padded. In addition to standard handles, there is a pair of adjustable shoulder straps that allows you to carry the instrument hands-free as a "backpack." The hard bag also includes a decent sized external zippered pouch that's perfect for packing your strap, tuner, cables, spare strings and whatever other accessories you decide to take with you. (Figure 5)


Figure 5: A travel guitar needs a good case, and the GS Mini comes with a heavy duty and highly padded "hard bag"
TAKE ONE WITH YOU

As a "travel guitar", the GS Mini works quite well. It's not much longer than the Baby Taylor (36 5/8" vs the Baby's 33 3/4" length), so fitting it into overhead bins on airliners shouldn't be a problem. It also makes really nice beach or campfire guitar. Due to the solid spruce top, I'd want to give at least some care to avoiding extremes of temperature (and proper humidity conditions are important to any solid wood guitar), but the laminated back and sides seem fairly sturdy and up to the rigors of on-the-go use. The included "Hard Bag" is also helpful here, with the included "backpack" straps allowing you to wear the guitar on your back when hiking or biking - just don't fall!

If you pressed me for a single word to describe the GS Mini, it would be "seductive." Time and time again, I found myself drawn to it; picking it up and playing it at a moment's notice and for just the sheer fun of it. I have not had this much pure playing fun with an acoustic guitar in quite a while. Not only is it super-easy to play due to the shorter scale length, fast neck and low action, but the voicing is far more full-range and inspiring than most travel sized instruments, which further reinforces its allure. This is a guitar that has appeal beyond the strict limits of the typical "travel guitar", and I can see it becoming a favorite of younger students, those with smaller hands, and even those of us who are accustomed to playing full-sized acoustic guitars but who want something in a handier size to keep at the office, sitting on a stand next to the couch, or to take with us when we travel. It's not just great for the journey, but a terrific musical companion once you arrive.

Specifications:
Shape: GS Mini
Finish: Satin Varnish
Back / Side Wood: Sapele Laminate
Top Wood: Sitka Spruce (Solid Mahogany available as an option at no additional cost)
Bracing: Scalloped X-Bracing with Relief Rout
Neck: Sapele
Fretboard: Ebony
Fretboard Position Markers: 5mm Dots
Number of Frets: 20
Tuners: Die-cast Chrome
Headstock Overlay: Lexan
Nut & Saddle: NuBone (TM)
Bridge: Ebony
Bridge Pins: Plastic
Overall Length: 36 5/8"
Scale Length: 23.5"
Body Length: 17 5/8"
Body Width: 14 3/8"


--------------------------------------------------------------------------------------------------
Liked this? Then Please share this page on Twitter (by clicking on the “Tweet” button) and subscribe to get the top stories of the week, plus the most popular reviews delivered straight to your inbox.

And don’t forget to give us your suggestions in the comments!


View the original article here

Transcribing Guitar Parts with Capo Software

Transcribing is a skill every guitarist should develop, and Capo software provides great tools to make the task easy and painless.

$50 (via download)


www.supermegaultragroovy.com
by Jon Chappell


Transcribing is an essential skill for a guitarist trying to amass as much information and knowledge as possible. Most people do it slowly and with much deliberation, but it doesn't have to be that way. In fact, transcribing can be fun and easy, especially if you get big assist from software. Software-based audio recorder-editors have essentially replaced the more cumbersome hardware tool-of-choice of yore, the multi-speed tape deck. A tape deck had some advantages, but the biggest setback is that when you changed speed, you also changed the pitch. That's okay if you're slowing down a blazingly fast up-the-neck guitar solo, but when you have fast passages in the lower register, slowing down the recording also drops the pitch to level that only blue whales and seismographs can detect. Software eliminates this problem. You can now hear the guitar in the register it was originally played in, but at a speed slow enough to enable capturing onto paper. Software offers other advantages that all visual-based editing systems have, including zooming, looping, spot-processing with EQ, and so on.

All high-end DAW software (Pro Tools, Cubase, Live, Sonar, Logic, etc.) and other loop composers offer tools to change pitch without affecting speed, and vice versa. But that's a lot of horsepower when you just want to grab some notes off a lick or fill you stumble upon while browsing your iTunes library. That's where Capo comes in. Now in version 2, Capo allows you to drag and drop an mp3 file from your library into it and then displays a piano-roll-type graphic analysis of your tune. Capo assigns waveform shapes, which reveal their pitch when you mouse over them. Pitches are represented vertically, durations horizontally.

This is a highly intuitive way to show notes, as you can easily see the up and down shape of the line, as well as note names by virtue of their vertical placement. The piano-roll arrangement of light and dark bands help you distinguish the 12 notes of the chromatic scale (with adjacent white bands for B-C and E-F).

Selecting a note turns it into an adjustable bar on the display, and automatically places it on the tab staff below (see Figure 1). Once selected above, the bar symbol can be lengthened and moved, the position of which is reflected in the staff below. Selecting notes this way allows you to pick out the important pitches in a solo from the non-important ones (including sounds played by other instruments). If you want to keep the note, but change a string (such as making an open 1st-string E a 2nd string/5th fret E), simply control-click the bar to put it on a different string. The program does the fret conversion for you.


Figure 1. Selecting a note on the graphic display turns it into an editable bar (seen in yellow above), and puts it on the tab staff below. The string/fret assignment can be changed. (Click images to englarge.)

SLOW PITCH


Of course, analysis is only part of Capo’s workings. It can also slow down (or speed up) your recorded music without changing the pitch. Again, all sophisticated audio editors can do this, but Capo is quick and simple. A sliding bar on the left-hand side of the screen allows you to quickly change the tempo by several large-scale percentages, including 3/4 (or 75% of the current speed—75 bpm instead of 100 bpm, etc.), 1/2 (50%, or half tempo), and 1/4. (There’s also a 1.5x speed for getting through ballads.) The audio gets more garbly-sounding with the smaller (slower-speed) fractions, but the quality is really good at 75% and pretty good at up to 50%. If in-between settings are required, just drag the bar slowly for fine-tuning the percentages, down to the unit percentage point (73, 72, 71, etc.).

Sometimes changing the pitch of a recorded passage is helpful in transcribing, and Capo does this with equal facility. For example, many guitarists (including Jimi Hendrix and Stevie Ray Vaughan) tune down their guitars a half step. So while they might be playing in the key of E on their guitars (using E, A, and B chords), the sound coming out of the speaker will be in Eb. You could retune your guitar down a half step, to match the recording, but a better way is to simply raise the pitch of the recording without changing the speed. Click on the Pitch button below the Speed button, and the bar will now move you in increments of a half-step, up or down the chromatic scale, plus or minus 24 semitones (two octaves).

Of course, you can combine the pitch and speed adjustments, slowing a song or passage down to, say, 67%, while raising or lowering its pitch any number of semitones. If you track the speed to the pitch (like -12 semitones at 50% speed), you’ll emulate an analog tape deck or turntable.

OTHER FEATURES


Capo provides many other transcribing aids. You can loop any selected audio portion for repeated playback while you shed a given passage. On the left side of the screen (see Figure 2), you have drop-down menus to change the instrument type (bass, mandolin, ukulele and banjo), tuning, and capo (if applicable). These are great translation shortcuts and saves you from doing the math while you’re just trying to hunt notes.

You can also selectively drop chord markers and type in the chord qualities yourself (see Figure 2). After you type in their names, the chords will sound the appropriate quality when you mouse-click them. This chord marker is a nice extra to have, but I’m not sure of its usefulness, at least with regard to transcribing.


Figure 2: On the left side of the screen, drop-down menus let you select among instruments, alternate tunings, and capo placement. You can selectively drop in chord markers too.

Over on the right side are three “Effects.” You can sum the stereo recording to mono and vary the strength of either channel. If you look closely at Figure 3, you’ll see that the slider is pushed to the right, and that the waveform squiggle of the Left channel (the lower one) has been reduced in amplitude. A three-position EQ allows you to better isolate bass, mid, and high frequencies, and you can dial in your own as well. Finally, a useful “vocal eliminator” function helps you reduce somewhat the lead vocals, allowing you to better hear the backing instruments.


Figure 3: The Effects section allows you to perform three useful functions when transcribing: summing to mono (note the reduced amplitude of the right channel in the setting above), EQ, and vocal reduction.

CONCLUSION


The speed and simplicity of Capo are its two greatest strengths. You can loop a passage, slow it down to any percentage of the original, and change the pitch up to two octaves in either direction, if necessary. That’s 95% of all transcribing work, and Capo does this beautifully. If you regularly transcribe using other instruments, and/or with a capo, you’ll appreciate the Note Settings tools. Audio fiddlers will appreciate the Effects section, as it really does give you an extra layer of control, especially for busy or complex mixes. You can even save and export your loops and edited files for others to review or for future reference. At just $50, there’s no reason every musician shouldn’t add Capo to their musical bag of essential software tools.


--------------------------------------------------------------------------------------------------
Liked this? Then Please share this page on Twitter (by clicking on the “Tweet” button) and subscribe to get the top stories of the week, plus the most popular reviews delivered straight to your inbox.

And don’t forget to give us your suggestions in the comments!


View the original article here

Big Sounds with Virtual Stacks

Use amp sims to create stacks that would be difficult, or even impossible, to do in the physical world


By Craig Anderton
When dealing in the world of guitars and amps, few things are more impressive than standing in front of a stack of cabinets. It’s not just about the visuals; multiple cabinets can add a tonal quality that’s impossible to duplicate in any other way. However, reality often intrudes in the form of how many physical stacks you can actually carry, hook up, and record (or play through live).

Fortunately, these days we don’t always have to live in the real world: We can live in a virtual one, and use amp sims to do our bidding.  After all, one of the great advantages of amp sims is you can try out sounds that would be a hassle to set up physically—like stacking two (or more) different amps and cabinets, with different effects, and spreading them out in stereo.

If you record through a plug-in amp sim in your computer (in this case the track itself is dry, and the final sound results from the amp sim processing the dry track), you can duplicate the dry track and add another amp sim in parallel to stack the sound. But that means you don’t hear the stacked sound until after you’ve played your part, and it’s more fun to play through the stack, as it influences your playing.

LIVING IN A PARALLEL UNIVERSE


You’ll want to split your guitar into at least two different paths to feed the different “stacks.” You can do this by inserting amp sims into two different tracks and setting each track’s input to the channel carrying the guitar, then monitoring the input signal through the computer (this function is typically called something like “input echo” or “live monitor”). This lets you hear the effects of any plug-ins. But that’s not always necessary; many amp sims can create parallel signal paths (that you can pan anywhere in the stereo field) all by themselves. Here are some screen shots (click on any image to enlarge) that show how various programs handle parallel processing.


With IK Multimedia’s AmpliTube series, there are 8 routing options; routing 2 creates two separate, parallel chains.


Line 6’s POD Farm has a Dual button that creates two different signal chains, which essentially puts two POD Farms in parallel.


Peavey’s ReValver Mk III and Native Instruments’ Guitar Rig both offer “splitter” modules for their “virtual racks.” These let you split the input signal into two paths, where you can insert whatever amps, speakers, etc. you want. Then, the splits go into an output mixer for mixing and panning. (However, note that Guitar Rig lets you put splits within splits, whereas ReValver Mk III is limited to one split module per rack.)

This setup uses Guitar Rig to emulate the sound of a guitar being split into two different amps and cabinets. The Split module sends the guitar through two chains, each of which contributes a different sound. Note how the Split Mix output can crossfade between the two channels and adjust the pan. Also, the B split has a phase switch.


Waves’ G|T|R has stereo amps, which provide the same basic function as stacked amps. However, if you want a parallel path where you can add effects and such independently to the two amps, then you’ll need to use two tracks, and two instance of G|T|R.

HAVING FUN WITH STACKS


Here are some ways to use stacking in the studio.


  • When mixing, a stereo rhythm guitar with the channels panned oppositely opens up a huge space in the center for bass. It’s almost like having two guitars, but with the simplicity of a single guitar part.
  • Use a tempo-synched effect like tremolo, but set different rhythmic values in the two chains. You can get some wild stereo effects bouncing around.
  • Try three stacks, with power chord sounds left and right, and a bright, chorused acoustic-type sound up the center. Add bass and drums, and you won’t need anything else—the sound can be huge.
  • If there’s a complementary instrument like keyboard or rhythm guitar, pan one channel of your guitar to center, and the other right or left. This “weights” the guitar toward one side of the stereo field. Similarly, weight the other instrument oppositely in the stereo field. Now both instruments take up a decent amount of space, but don’t tread on each other.
  • Splitting isn’t just about amps, but also effects. If you want some great flanging effects, put a vibrato effect set for a slow speed in each split (processed sound only). When you sum the outputs together in mono, the delay variations between the two splits will rock your world.


--------------------------------------------------------------------------------------------------
Liked this? Then Please share this page on Twitter (by clicking on the “Tweet” button) and subscribe to get the top stories of the week, plus the most popular reviews delivered straight to your inbox.

And don’t forget to give us your suggestions in the comments!


View the original article here

Fender Performance Inspired Audio Cables


These Kink-Free Cords Deliver Transparent Sound and Sport a Vintage Look


$32.00 MSRP, $27.99 Street
www.fender.com
By Jon Chappell


Though there are legions of golden-eared tonemeisters who scrutinize every element in their signal chain, most guitarists don’t give that much thought to their cables. They skip right from their instrument’s output jack to the amp or the first effect in the signal chain. But cables are an essential part of your setup, not only for sound but for the way you perform and handle them. After all, you don’t move your pedals and amps around with you as you play, but your cable has to go where you go. Next to your instrument, the cable is the closest signal chain component to your body.

Fender cares a lot about cables and has released the Performance Inspired Audio Cable series, which focuses both on and audio as well as user-friendliness. This series includes many different types of cables for all your audio needs. There are instrument, microphone, and speaker cables, all in various lengths, with different connectors and gauges, where appropriate. Let’s look at some common elements in the Performance Inspired series before checking out the specific cables themselves.

NO BAD MEMORIES HERE


All Inspired Performance audio cables share an important quality musicians will appreciate right away: their lack of “physical memory,” an undesirable trait where cables tend to coil back into their previously wrapped
state. This also makes them more prone to kinking—putting stress not only on the insulation but the wire core.

But Fender Inspired cables won’t kink and don’t suffer from memory retention. You notice this while still in the packaging. For example, the instrument cable comes coiled in about nine wraps. This put an 18.6" foot cable into a circular shape of about nine inches in diameter. But when removed from its packaging, the cable unrolled into a virtual straight line. Try as I might, I couldn’t reproduce the original diameter with any predictable degree of accuracy because there was no previous shape to go by—a complete lack of physical memory! All cables wrap easily at the end of a gig, and conform completely to your storage dimensions, whatever they may be.

COLORLESS SOUND—THAT'S A GOOD THING


The other important element in a cable, of course, is its sound—or rather, its lack of contribution to the sound. Plenty of cables will color the sound, and some are even proud of this effect. Not here. You don’t hear any difference in your tone as the result of using these instrument cables, whether you’re using full-length ones or the shorter patch cables to connect between effects pedals. These are transparent as can be. What you put in is what you get out.

I put all three types—instrument, mic, and speaker—to the test, listening closely for high-end drop-off. No aspect of my sound lost any of the clarity or drop in frequency response from the original signal. This is true of the speaker cables in either gauge: 16 AWG as well as the heavier-duty 14 AWG.

CABLE CONSTRUCTION


Cables don’t have moving parts or a view to their inner workings (unless they accidentally get sliced open by a lawn mower—don’t ask me how I know this), so it helps to know just what’s behind some of the components. The instrument cables feature a two-conductor 1/4" commercial-grade plug on each end, custom designed by Fender specifically for the Inspired series. Nickel-plated steel barrels and shafts accommodate Fender’s uniquely thick-diameter cable, and will withstand years of heavy use. Silver contacts and solder provide quiet and reliable connections. A nickel-plated zinc crimp-style strain relief and PVC shrink tube encase the connector and provide additional reinforcement.

For the XLR (microphone) cables, a custom-designed connecter was used to accommodate Fender’s new larger-diameter cables here as well. Finished in black, the nickel-steel housing and silver contacts yield quiet and reliable connections. Black PVC strain reliefs also provide additional reinforcement.

For their speaker cable connectors, Fender went with a best-of-breed choice: the ubiquitous Speakon. Speakons are the industry standard for amp-to-loudspeaker connections and are designed to operate in the high-current inductive-load environment of loudspeakers. Fender’s speaker cables feature a robust plastic housing, traditional Neutrik chuck-type cable clamp, touch-proof contacts, and a unique locking mechanism for extra security (great for those long runs and outdoor gigs!). As mentioned, they come in either 16 AWG or 14 AWG.

CABLE-READY


A cable should be a lot like plumbing: when doing its job, the result should be completely invisible to the user. Not only were all three cables completely neutral with respect to a sonic signature, the mic and instrument cables didn’t resist me in any way during my various stage movements. Their suppleness assured me complete free reign in walking and turning, never kinking or coiling in the slightest. The instrument cables even look great, too: white jacket-wrapped ends pays tribute to the vintage Fender look, especially if you’re playing a black-and-white Strat—Eric Clapton’s Blackie, anyone? Fender’s Custom Shop also offers tweed versions. The construction is identical, but the tweed fabric is just a little more high-end in the aesthetics department, especially if you like the look or Fender vintage amps and instruments cases.

But whether you go high-end or opt for the working musician’s version, Fender’s Performance Inspired audio cables ensure you always sound your best and that you don’t neglect the all-important link between your music-making gear.


--------------------------------------------------------------------------------------------------
Liked this? Then Please share this page on Twitter (by clicking on the “Tweet” button) and subscribe to get the top stories of the week, plus the most popular reviews delivered straight to your inbox.

And don’t forget to give us your suggestions in the comments!


View the original article here

2012/02/01

New "Dangerous Source" Monitor Controller Announced at NAMM

Leader in Monitor Control Debuts Portable & Desktop Unit Anaheim, CA - January 19, 2012 - At the 2012 Winter NAMM show, Dangerous Music announced their newest monitor controller, the "Dangerous Source" - a portable and desktop unit designed for the engineer on the go or to fit a limited space on the desktop. Dangerous Music is one of the industry leaders in dedicated monitor controllers and helped usher in the product category over 10 years ago with the Dangerous Monitor - widely regarded as a  benchmark of quality. Dangerous Music monitoring products have been nominated and won many prestigious industry awards including Pro Audio Review magazine's PAR Excellence Award, TEC Award, EM Editors Choice, MIX Magazine's Certified Hit, and Future Music Magazine's ACE Award among others.
The new sleekly designed "Dangerous Source" builds on this sterling reputation as a perfectly tuned complement to any DAW for its centralized control of speakers, headphones, and more. The Source fits perfectly beneath a 13" laptop computer, but it can also sit unobtrusively on the desktop within arms reach to provide easy control of volume, input selection, speaker switching, and headphone control. An input for USB audio simplifies a traveling mix rig even further. The "Dangerous Source" is set for release in early Q2, 2012, the price is to be announced.

"With the explosion of professional recording and mixing being done on today's powerful laptop computers, we wanted to bring our standard of audio path quality and functionality to portable monitor control," says Bob Muller, President of Dangerous Music. "We've been making monitor controllers since before the product category existed in the mainstream, so the Dangerous Source seemed like  the logical next step in the lineage of Monitor, Monitor ST and D-Box.  We've also added a first for our products in that the Source connects directly to the computer via USB, saving even  more cable hassles for the traveling engineer.

"The Dangerous Music "Source" monitor controller announced at NAMM 2012 shown with a 13" laptop

The "Dangerous Source" monitor controller sports many of the key  professional features of the company's award-winning Dangerous D-Box,  such as speaker switching for two sets of speakers, speaker volume,  AES/SPDIF digital IN, 2 Stereo Analog IN, dual headphone out with a separate level control, and in addition, it can connect  directly to a computer for monitoring of digital audio over USB. Dangerous Source is capable of up to 24-bit 192kHz on both digital  inputs. Although the Dangerous Source is the company's first non-rack mount product, an optional 1RU user-installable front panel  option will be available.


Highlights of the "Dangerous Source" Monitor Controller:

  •  Desktop form factor sits comfortably under a 13" laptop
  •  Optional 1RU front panel available
  •  Supports 2 pairs of speakers
  •  Alternatively select both speaker outputs simultaneously for speakers and subwoofer combination• Layering of multiple inputs in both the speaker and headphone outputs
  •  2 Analog IN: unbalanced 1/8" mini stereo at -10 dBv, balanced XLR/1/4" combo jack at +4 dBu
  •  AES/SPDIF digital IN, up to 24-bit/192 kHz
  •  USB IN, up to 24-bit/192kHz for Windows and Mac
  •  Line-level pass-thru for Control Room output
  •  Buffered digital thru output for AES/SPDIF input

  •  Set for a Q2 2012 release, price TBD


About Dangerous Music

Dangerous Music, Inc. designs and builds products that are indispensable to any DAW-based recording environment. Dangerous Music electronics designer Chris Muth has spent over 20 years working in and  designing custom equipment for top recording and mastering studios. Muth and company founder Bob Muller pioneered the concept of  the dedicated analog summing buss for digital audio workstations with  the Dangerous 2-Bus in 2001. Today the company offers a wide range of  products for recording, mastering, mixing and post-production facilities, all designed and built with mastering-quality standards and a  practical aesthetic. Key products include the Dangerous 2-Bus and 2-Bus LT, Dangerous Monitor ST-SR and its Additional Switching System expansion units, Dangerous D-Box, Dangerous Master, Dangerous Liaison, Dangerous Monitor and Dangerous Bax EQ.

For more information on Dangerous Music visit http://www.dangerousmusic.com


--------------------------------------------------------------------------------------------------
Liked this? Then share this page and subscribe to get the top stories of the week, plus the most popular reviews delivered straight to your inbox.

And don’t forget to give us your suggestions in the comments!


View the original article here