Showing posts with label Guitar. Show all posts

2012/06/02

Basics of Recording Electric Guitar


Ready to record electric guitar? Before you put your pick on a string, make sure these basics are in place. 


By Craig Anderton

Recording electric guitar is simple, right? You just plug the guitar into an interface’s guitar input, go through a DI box into a mixer, or stick a mic in front of an amp. But there are a few other basic considerations you need to consider first.


THE INSTRUMENT


The type of guitar, choice of pickups, string material, and tone control settings make a huge difference in the overall recorded sound. Get as close as you can to the sound you want by working with these options first, then start experimenting with the mic and amp. Check intonation prior to the session (and whenever you change a string), and check tuning constantly: It’s virtually impossible to fix an improperly tuned or intoned guitar in the mix.


MINIMIZING EMI


Power supplies, transformers, dimmers, and other sources of EMI (electro-magnetic interference) can get into your guitar’s pickups. Turn all dimmers full on or full off. Turn off any gear that isn’t being used. Experiment with the guitar’s orientation with respect to other gear, and choose the position that gives minimum interference.


MICROPHONE TYPE


Dynamic mics (like the Shure SM57) are the “old standby” as they can handle high power levels and have a naturally “warm” tone that complements amps. Large-diaphragm condenser mics are also popular, typically with any pad switch engaged due to a greater difficulty handling extremely high SPLs compared to dynamics.

They also tend to give brighter highs and lower lows. Newer ribbon mics (the image shows a Royer ribbon mic placed close to a cabinet for more bass buildup) are gaining popularity for miking amps, because they’re not as fragile as older ribbon types. They tend to pick up more room ambience, but remember that excessive levels can damage older ribbon mic elements.


MIC POSITION


The relationship of the mic to the amp speaker has a major effect on the sound. Pointing the mic directly at the speaker gives more highs than angling the mic, as a mic’s off-axis response tends to pick up fewer high frequencies. However, where you point the mic also matters; for example, pointing toward the outside of the speaker may give a “tighter” sound than pointing at the center. Also, if a cabinet has multiple speakers, try each one—not all speakers, even ones from the same production run, are identical. The distance from the amp also makes a difference. Placing the mic further away from the speaker picks up more room sound and ambience. For best results, listen in the control room while someone else adjusts the mic; or, adjust the mic yourself, while saying what you’re doing (“Mic pointing at cone, 2" away). Listen back to which sounds best, then re-create the setting you described.


MIC LOW PASS FILTERS


Engaging a mic’s low pass filter, if present, can “tighten up” the sound as it usually affects frequencies below the range of the guitar. This reduces hum and room rumble but doesn’t alter the guitar tone.


RECORDING DIRECT


To preserve your guitar’s high frequency response and output level, record into an input with a high impedance (at least 100, and preferably 220, kilohms). Many audio interfaces have an “instrument input” for this purpose; the illustration (click to enlarge) shows the two front panel guitar inputs for Avid's Mbox (3rd generation). Standard passive direct boxes may not be suitable. If you’re using stomp boxes or other effects prior to your audio interface, its impedance is not an issue: Impedance matters only for the first device “seen” by the guitar.


COMBINING DIRECT AND MIKED SOUNDS


The sound coming from the mic will be delayed compared to the direct sound (approximately 1 millisecond of delay for each foot of distance between the mic and speaker). Combining the direct and miked sounds may sound “thin” due to the comb filtering caused by this time difference. In a DAW, temporarily pan both mics to center and nudge the miked sound forward (earlier) in time to compensate; compare the mix of the two sound sources until you achieve the best tone.


MULTIPLE CABINETS


It’s common to set up two (or more) cabinets and mic both. Variations in the cabinets and miking create a convincing stereo spread when one cabinet is panned more toward the left and the other panned more toward the right.


MULTIPLE MICS


There are two main applications for multiple mics. One is to have a mic (or mics) close to the amp, and one or more mics in the room to pick up ambience and reflections. The other is to place two mics on a single amp and vary the blend between them to create a particular sound. In the latter situation, it’s common to use very different mics (for example, a dynamic and a condenser). During mixdown these can be set to different levels, have one thrown out of phase compared to the other to give “pseudo-EQ” effects, and possibly even have different processing, to create a sound that’s very different compared to using a single mic.


BIG AMPS VS. LITTLE AMPS


Using a big amp and cranking it to get your “sound” will also put lots of reflections into the room where you’re recording, and when these are picked up, may give an overly-diffused effect. You may obtain better results by cranking a small amp, which may sound the same to the mic but not be as loud. This may also be a necessary solution if you’re recording in a location where noise can bother others.


GETTING SUSTAIN WITH RE-AMPING


Re-amping involves recording a dry guitar sound to a DAW, then running it through an amp or amp simulator plug-in on mixdown to allow choosing the perfect tone for the track. However, it also makes sense to play through an amplifier and record both the amp and dry guitar sounds. The amplifier can give more sustain, or even controlled feedback; and if you like the sound, you can always use it and not have to bother with re-amping. An added bonus is that the amp sound will often make a good complement to the re-amped sound, and facilitate creating a stereo image.
Photo courtesy Royer Labs


--------------------------------------------------------------------------------------------------
Liked this? Then Please share this page on Twitter (by clicking on the “Tweet” button) and subscribe to get the top stories of the week, plus the most popular reviews delivered straight to your inbox.

And don’t forget to give us your suggestions in the comments!


View the original article here

2012/06/01

The Many Uses for Digital Delay


Use your digital delay to produce many more effects than just echo—including flanging, chorus, doubling, and reverb


By Jon Chappell


The two most important effects in a guitarist’s signal chain are distortion and delay. And if you derive your tone strictly from the amp—whether it’s squeaky clean or buzzsaw nasty—then the digital delay is numero uno.


The Deja Vu, by Seymour Duncan, is an example of a delay pedal that includes modulation control, and can therefore be pressed into service providing effects like flanger and chorus, in addition to conventional delay-based effects. (Click images to enlarge.)

Many guitarists think of delay (a.k.a. “DDL,” for “digital delay line”) as the effect that produces an echo sound, and while that’s true, it doesn’t begin to tell the whole story of what a delay is capable of. A full-featured digital delay unit, one with precise controls, complex modulation circuitry, and good display read-outs can produce a range sounds—from flanging to chorus to doubling to ambience to slapback, to discrete repeats that can be synched to tempo-dependent rhythmic values. The Seymour Duncan Deja Vu is one example of a delay unit that includes extensive modulation controls, but other pedals, including the Empress Superdelay and Diamond Memory Lane 2 have them as well.

Many smart guitarists employ more than one delay in their chain, assigning them different duties, even if each has identical parameters. A DDL is one effect that works especially well when chained together with itself. Let’s take a look at the many roles in which a digital delay can serve the guitarist.


BASIC DDL OPERATION


Most people know, or can intuit, the way a delay works: it produces an exact copy (a sample, or digital recording, really) of the original signal in real time, and blends the signals together. The normal parameters are Delay Time (how long in milliseconds after the original sound the copied sound plays), Effect Level (the loudness of the repeated signal relative to the original), and Feedback, which is just another way of saying “number of repeats” (which goes from a single repeat to infinite repeats).

All delays feature two outputs, which allows you to route the original, straight signal to a different place from the effected (repeated) signal. You can get the blended signal from one output (the most common usage) so that you can plug into one input on your amp, as most guitarists do. But you can also send your outputs to two different destinations—to different channels on a stereo amp, to separate mixer channels, or even separate amps entirely to produce a true stereo guitar signal.

With longer delay times, you can create drippy-wet sounds to fill out a slow-note solo in ballad or produce the famous “cascade” sound, which includes Van Halen’s “Cathedral,” Nuno Bettencourt’s “Flight of the Wounded Bumble Bee,” and Albert Lee’s “Country Boy” or his solo on Emmylou Harris’s “Luxury Liner.” With super-long delay times (from a few seconds to several seconds), you can turn your delay into a live multitrack recorder, laying down successive looped passages to jam over. Units such as the DigiTech JamMan, Line 6 DL4, and Boss Loop Station series are loop recorders, and are actually several DDLs in one box that allow for overdubbing loops.

With all these different possibilities at your delay’s disposal, let’s take a look at some sample control settings that will get you on your way to producing the many different types of effects available on a DDL.


TIME DELAY AND OTHER EFFECTS


The length of the delay time is the primary factor in determining the effect you want to create, whether that’s a modulation type (flanger, chorus) or more ambient (reverb, echo). Figure 1 shows a graph of the different effects in order of increasing delay time, shown in milliseconds (thousandths of the second). Most high-end delays have a modulation feature, which is some variation (or variations) on a low-frequency oscillator that sweeps the delay time up and down. Depending on the initial delay setting and the amount of feedback (regeneration), it’s the modulation control that can create a flanger and chorus sound, or generally turning the signal whooshy. Keep the modulation control on zero if you want the delay effect a sound like the original input signal.


Fig. 1. A graph of time in milliseconds and the associated effect produced.

Some stomp box versions dispense with the modulation control, so you won't be able to get a very deep sound in the flanging and chorus departments. But subtle effects that approach a true chorus is sometimes all that’s called for to give a sound a slight sense of movement.

The Feedback control, also referred to as regeneration, determines how many times the output, or effected signal, is fed back into the processor. With the Feedback control at zero, a single repeat is produced, which is good for cascades, harmonies, and loops, but not good for ambient or more swirling textures.

Cranked to the max, the Feedback control produces infinite repeats—or runaway feedback of Feedback, if you will. About five or six repeats are good enough to produce reverb and slapback (an effect popular in rockabilly vocals), as each successive repeat gets quieter, simulating a natural echo.

The Effect Level determines how loud the effected signal is relative to the original input signal. At 0% you won’t hear any effect (the signal comes through dry); at 100% the effect signal is at equal loudness to the original. So if you take the following three steps of 1) setting the delay time long enough (200ms or longer) to hear a separate repeat; 2) putting the effect level at 100%; and 3) applying no feedback or modulation; you will hear two identical repetitions of a note or chord struck once. To a listener who can’t see your hands, it would sound like you played that note or chord twice. This is the key ingredient in the cascade sound, but it’s also good for other rhythmic repeats that are synched to the existing tempo.


EFFECTS SETTINGS


Figure 2 shows how to roughly set your knobs to achieve some different time based delay effects. Exact settings will depend on the musical situation and your particular tastes. But it’s a good idea to establish the time delay first, and then the effects level, before moving on to feedback or modulation.


Fig. 2. A four-knob schematic showing various settings for delay-produced chorus, reverb/slapback, cascade, and loop.


CONCLUSION


Most shorter delay-time effects are “set and forget”; you dial it up according to how it sounds in isolation and don’t have to do anything more for the effect to cooperate with the surrounding music. In other words, one setting can apply to fast or slow tempos, 16th notes, or whole notes. But when the delay time gets past the slapback stage into the 200ms+ range, you have to structure the delay time to the particular tempo and rhythmic values you’re playing. That’s when some math is necessary, but where the real fun begins.


--------------------------------------------------------------------------------------------------
Liked this? Then Please share this page on Twitter (by clicking on the “Tweet” button) and subscribe to get the top stories of the week, plus the most popular reviews delivered straight to your inbox.

And don’t forget to give us your suggestions in the comments!


View the original article here

2012/02/07

Taylor GS Mini

Travel sized acoustic guitar with full sized playability and a surprisingly big voice
http://www.taylorguitars.com/guitars/acoustic/gs-mini
$679.00 MSRP, $499 "street"


By Phil O'Keefe

Travel guitars are an interesting, if somewhat niche product. They allow many guitarists the ability to take a guitar with them in situations where a full-sized instrument might be too cumbersome or obtrusive, but their playability is often a bit of a compromise due to very short scale lengths and narrow fingerboards, and their small bodies often produce less than inspiring sound quality. However, many musicians are willing to tolerate these shortcomings simply because they have had little choice -- when traveling, a compact sized instrument is easier to take along; you could have big sound, or a small instrument, and you couldn't really get both -- until now.


Figure 1: The Taylor GS Mini (click on images to enlarge)

Taylor is no stranger to travel guitars. Their own Baby Taylor model has been a big success and a part of their product line since 1996, and for the past few years, I myself have been fond of keeping one handy when working in the studio -- not only for it's own unique and slightly quirky recorded timbre, but also as a guitar I can grab and use to quickly demonstrate musical ideas and suggestions to other musicians. As handy and as useful as the Baby has been, it does have some limitations; most noticeably, it doesn't offer the volume and projection of a full sized instrument, nor anywhere near the full range frequency response of a large guitar. Taylor took the features that made the Baby so popular and expanded on them with the GS Mini, with the intention of creating a guitar that could serve equally well as a travel companion or modern-day parlor guitar for use around the house. Based on my experiences with the review unit, I'd say they nailed those goals.


CONSTRUCTION AND MATERIALS

The GS Mini is a classy looking little guitar, with a definite Taylor vibe to the aesthetics. The solid sitka spruce top has a satin varnish finish and is bordered by black / white / black purfling around the edges, which matches nicely with the black and white three-ring rosette around the full-sized 4" soundhole. A tortoise pickguard with a familiar Taylor styled shape is also included, and like the Baby, the GS Mini has a black Lexan laminate on the front of the traditional Taylor shaped headstock, with the Taylor logo displayed at the top. The truss rod adjustment is also located at the headstock, and is hidden under a black plastic cover. The black headstock face visually ties in nicely with the GS Mini's ebony fingerboard and bridge.

The two piece, bookmatched solid sitka spruce top has some dark figuring here and there in the wood - it's not as even in color as the spruce on some of Taylor's high-end models, but the bookmatching means the patterning is uniform, and while looks are subjective, I thought it gave the guitar some unique and individual visual appeal. (Figure 2) The top is X braced, and careful examination of the interior with a light and a dental mirror revealed scalloped braces and clean construction, with no unexpected gaps or globs of glue.

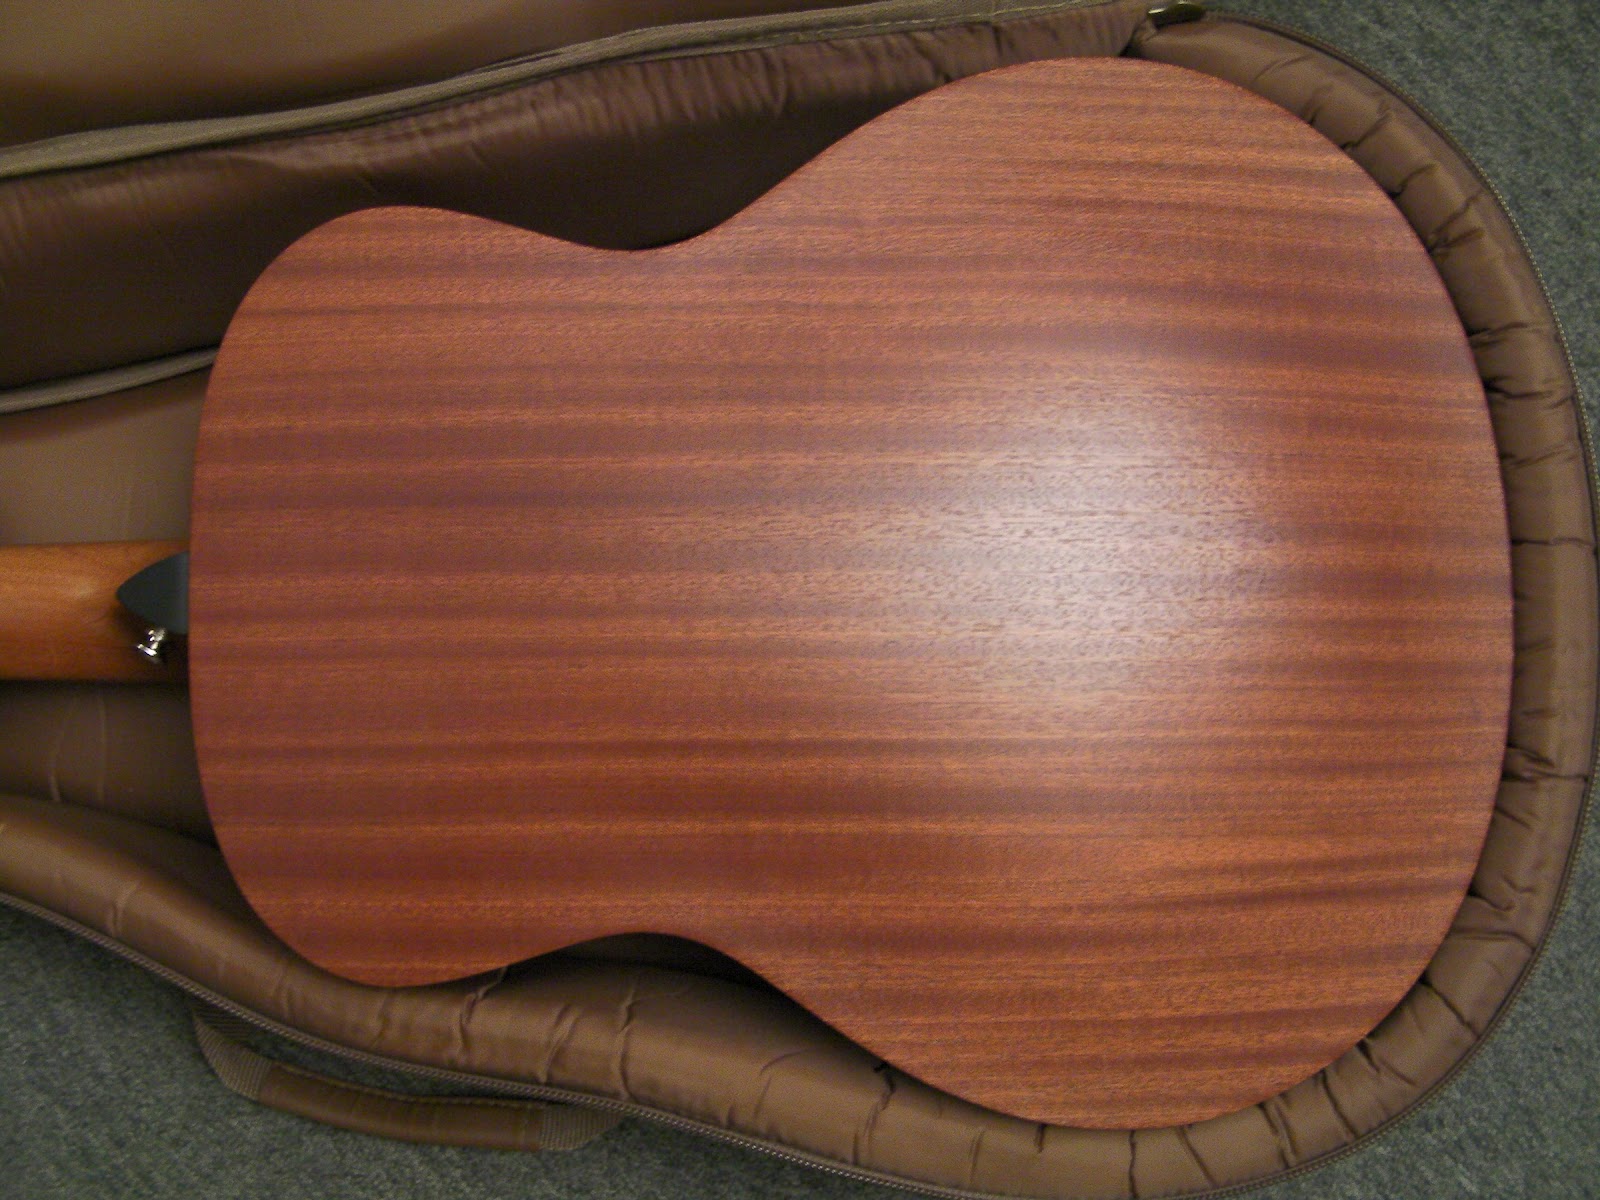
The body is a scaled down version of Taylor's own GS, or Grand Symphony body style. There is some open-pore grain texture to the satin varnish finished African sapele laminate back and sides. The back is arched and braceless. The body wood has some striping to it -- areas where the shading is subtly darker and lighter; similar to figured maple, but with much wider bands. (Figure 3) The appearance is not unlike the highly figured American mahogany on my Taylor 510, and the similarities go beyond the cosmetic - the overall tone of sapele is also very close to mahogany, although with a touch of added "zing" to the highs, in a manner similar to maple. The resulting tone of the GS Mini has a bit of midrange emphasis, and is articulate and bright in the treble, with excellent note definition. The full depth (4.5") body and full-sized sound hole gives it a bigger, deeper bass tone than the small body length and width would lead you to believe, but it lacks the beefy wallop of a full sized jumbo or dreadnought. Still, I was pleasantly surprised by just how full the bass is. There's a brilliance to the bass notes that really speaks nicely on bass register runs and alternating bass accompaniment.

The slightly open grained satin texture extends to the solid sapele neck, although it doesn't affect the smooth feel or playability, which I would describe as being very fast and nearly effortless. Taylor's patented NT Neck supports the fingerboard even in the area over the guitar's top, and allows for easy adjustability of the neck angle, and even eases neck resetting and replacement if the need arises. Neck width at the nut is 1 11/16" which is a fairly standard size. I didn't feel like my fingers were cramped into a overly narrow fingerboard. This is important, because in conjunction with a shorter scale length, a too-narrow fingerboard can lead to playing difficulties. Thankfully, Taylor kept the fretboard width full-sized. The nut and compensated bridge saddle are made out of NuBone, a synthetic material from GraphTech. NuBone is a derivative of their proprietary TUSQ man-made "ivory" material, with similar tonal properties.The sealed tuning machines bear no branding marks, but have a similar look and feel to some of Schaller's tuners. Regardless of who makes them, they feel very smooth and held their tuning just fine.


Figure 2: The review unit's bookmatched Sitka Spruce top


Figure 3: The laminated Sapele back and sides are nicely figured. Note the thickness of the padding on the included "hard bag"


PLAYABILITY AND SOUND

Let's get right down to it -- the GS Mini plays, responds and sounds far more like a "real" acoustic" than a "travel guitar." Compared to the Baby Taylor (Figure 4), the GS Mini is capable of getting quite a bit louder, and can easily hang with full sized instruments at informal jam sessions in the backyard or living room without compressing and bottoming out. In fact, the guitar is surprisingly touch sensitive, and responds equally well to being played with gusto as much as it does to being delicately caressed. This outstanding dynamic response is fairly uncommon in smaller guitars, and is a big part of the Taylor's appeal from a playability standpoint.

The shorter 23.5" scale length feels compact, but not nearly as closely spaced as the 22.75" scale of the Baby Taylor models. The stock strings are also heavier; a medium gauge set of Elixir Nanowebs. While this may be heavier than many players are used to using, the feel is offset by the lower tension of the short 23.5" scale length. Coupled with the comfortable neck, the feel is surprisingly "electric" and extremely easy to play, inviting you to explore the entire length of the fingerboard. The big strings under lower short scale tension also helps add fullness and warmth to the tone. The guitar arrived tuned to standard E tuning straight out of the box, and unlike some acoustic guitars, is designed to handle standard tuning with medium gauge strings without risk of damage. The action is exceptional. It's low and consistent up and down the entire length of the neck. Electric players should feel quite at home on it, and the fast neck makes this a good choice for a backstage / dressing room warm-up guitar. Of course, the small size will also work well in cramped tour bus quarters too.

The guitar works equally well when played with a flatpick or fingerstyle. The voice is crisp and clear, with fullness in the bottom but no boominess or mud. The dynamic response to changes in the force of the player's touch is outstanding, and it's really easy to go from soft and delicate tones to a shockingly loud full volume roar when strummed or plucked hard. There doesn't seem to be nearly the same degree of compression and volume limiting when the guitar is driven hard - unlike many small bodied travel guitars. While the sound lacks the booming bass of a full-sized dreadnought or jumbo bodied guitar, there is a lot more fullness to the sound than you might expect based solely on its relatively small dimensions. Taylor attributes this to the larger soundhole and deeper, full-sized body depth. Whatever the reasons, many players are pleasantly surprised by the tonal balance when they first play a GS Mini. To capture that sound when recording, I found that traditional mic techniques, such as a condenser at the 14th fret, worked well, but I felt I had the best results with a good pair of small diaphragm condensers in an XY stereo setup placed about 8 - 12" directly in front of the soundhole.


Figure 4: A size comparison -- the GS Mini, a Taylor 510 Dreadnought, and a Baby Taylor


OPTIONS AND ACCESSORIES

The GS Mini was designed to accept the optional ES-Go pickup. This is a magnetic stacked coil humbucking pickup that "floats" at the front of the soundhole without actually coming into contact with the top. According to Taylor, it can be easily installed by the guitar's owner using factory-installed fixtures inside the GS Mini. All of the mounting clips are already pre-installed, and adding the ES-Go requires only a few minutes and a small screwdriver. When coupled with Taylor's V-Cable, which incorporates a built-in volume control into a right-angle 1/4" plug, this gives the player a built-in pickup and a volume control at the output jack, which is located at the rear strap button. Unfortunately, I was unable to test these as part of this review (although I hope to do so in a separate review in the near future), but with even a casual look inside the GS Mini it's easy to see the mounting clip for the optional pickup and the tie-down points for the interior wiring.

One thing that isn't optional is the case. The included "hard bag" is stiffer than many gig bags, and nicely padded. In addition to standard handles, there is a pair of adjustable shoulder straps that allows you to carry the instrument hands-free as a "backpack." The hard bag also includes a decent sized external zippered pouch that's perfect for packing your strap, tuner, cables, spare strings and whatever other accessories you decide to take with you. (Figure 5)


Figure 5: A travel guitar needs a good case, and the GS Mini comes with a heavy duty and highly padded "hard bag"
TAKE ONE WITH YOU

As a "travel guitar", the GS Mini works quite well. It's not much longer than the Baby Taylor (36 5/8" vs the Baby's 33 3/4" length), so fitting it into overhead bins on airliners shouldn't be a problem. It also makes really nice beach or campfire guitar. Due to the solid spruce top, I'd want to give at least some care to avoiding extremes of temperature (and proper humidity conditions are important to any solid wood guitar), but the laminated back and sides seem fairly sturdy and up to the rigors of on-the-go use. The included "Hard Bag" is also helpful here, with the included "backpack" straps allowing you to wear the guitar on your back when hiking or biking - just don't fall!

If you pressed me for a single word to describe the GS Mini, it would be "seductive." Time and time again, I found myself drawn to it; picking it up and playing it at a moment's notice and for just the sheer fun of it. I have not had this much pure playing fun with an acoustic guitar in quite a while. Not only is it super-easy to play due to the shorter scale length, fast neck and low action, but the voicing is far more full-range and inspiring than most travel sized instruments, which further reinforces its allure. This is a guitar that has appeal beyond the strict limits of the typical "travel guitar", and I can see it becoming a favorite of younger students, those with smaller hands, and even those of us who are accustomed to playing full-sized acoustic guitars but who want something in a handier size to keep at the office, sitting on a stand next to the couch, or to take with us when we travel. It's not just great for the journey, but a terrific musical companion once you arrive.

Specifications:
Shape: GS Mini
Finish: Satin Varnish
Back / Side Wood: Sapele Laminate
Top Wood: Sitka Spruce (Solid Mahogany available as an option at no additional cost)
Bracing: Scalloped X-Bracing with Relief Rout
Neck: Sapele
Fretboard: Ebony
Fretboard Position Markers: 5mm Dots
Number of Frets: 20
Tuners: Die-cast Chrome
Headstock Overlay: Lexan
Nut & Saddle: NuBone (TM)
Bridge: Ebony
Bridge Pins: Plastic
Overall Length: 36 5/8"
Scale Length: 23.5"
Body Length: 17 5/8"
Body Width: 14 3/8"


--------------------------------------------------------------------------------------------------
Liked this? Then Please share this page on Twitter (by clicking on the “Tweet” button) and subscribe to get the top stories of the week, plus the most popular reviews delivered straight to your inbox.

And don’t forget to give us your suggestions in the comments!


View the original article here

Transcribing Guitar Parts with Capo Software

Transcribing is a skill every guitarist should develop, and Capo software provides great tools to make the task easy and painless.

$50 (via download)


www.supermegaultragroovy.com
by Jon Chappell


Transcribing is an essential skill for a guitarist trying to amass as much information and knowledge as possible. Most people do it slowly and with much deliberation, but it doesn't have to be that way. In fact, transcribing can be fun and easy, especially if you get big assist from software. Software-based audio recorder-editors have essentially replaced the more cumbersome hardware tool-of-choice of yore, the multi-speed tape deck. A tape deck had some advantages, but the biggest setback is that when you changed speed, you also changed the pitch. That's okay if you're slowing down a blazingly fast up-the-neck guitar solo, but when you have fast passages in the lower register, slowing down the recording also drops the pitch to level that only blue whales and seismographs can detect. Software eliminates this problem. You can now hear the guitar in the register it was originally played in, but at a speed slow enough to enable capturing onto paper. Software offers other advantages that all visual-based editing systems have, including zooming, looping, spot-processing with EQ, and so on.

All high-end DAW software (Pro Tools, Cubase, Live, Sonar, Logic, etc.) and other loop composers offer tools to change pitch without affecting speed, and vice versa. But that's a lot of horsepower when you just want to grab some notes off a lick or fill you stumble upon while browsing your iTunes library. That's where Capo comes in. Now in version 2, Capo allows you to drag and drop an mp3 file from your library into it and then displays a piano-roll-type graphic analysis of your tune. Capo assigns waveform shapes, which reveal their pitch when you mouse over them. Pitches are represented vertically, durations horizontally.

This is a highly intuitive way to show notes, as you can easily see the up and down shape of the line, as well as note names by virtue of their vertical placement. The piano-roll arrangement of light and dark bands help you distinguish the 12 notes of the chromatic scale (with adjacent white bands for B-C and E-F).

Selecting a note turns it into an adjustable bar on the display, and automatically places it on the tab staff below (see Figure 1). Once selected above, the bar symbol can be lengthened and moved, the position of which is reflected in the staff below. Selecting notes this way allows you to pick out the important pitches in a solo from the non-important ones (including sounds played by other instruments). If you want to keep the note, but change a string (such as making an open 1st-string E a 2nd string/5th fret E), simply control-click the bar to put it on a different string. The program does the fret conversion for you.


Figure 1. Selecting a note on the graphic display turns it into an editable bar (seen in yellow above), and puts it on the tab staff below. The string/fret assignment can be changed. (Click images to englarge.)

SLOW PITCH


Of course, analysis is only part of Capo’s workings. It can also slow down (or speed up) your recorded music without changing the pitch. Again, all sophisticated audio editors can do this, but Capo is quick and simple. A sliding bar on the left-hand side of the screen allows you to quickly change the tempo by several large-scale percentages, including 3/4 (or 75% of the current speed—75 bpm instead of 100 bpm, etc.), 1/2 (50%, or half tempo), and 1/4. (There’s also a 1.5x speed for getting through ballads.) The audio gets more garbly-sounding with the smaller (slower-speed) fractions, but the quality is really good at 75% and pretty good at up to 50%. If in-between settings are required, just drag the bar slowly for fine-tuning the percentages, down to the unit percentage point (73, 72, 71, etc.).

Sometimes changing the pitch of a recorded passage is helpful in transcribing, and Capo does this with equal facility. For example, many guitarists (including Jimi Hendrix and Stevie Ray Vaughan) tune down their guitars a half step. So while they might be playing in the key of E on their guitars (using E, A, and B chords), the sound coming out of the speaker will be in Eb. You could retune your guitar down a half step, to match the recording, but a better way is to simply raise the pitch of the recording without changing the speed. Click on the Pitch button below the Speed button, and the bar will now move you in increments of a half-step, up or down the chromatic scale, plus or minus 24 semitones (two octaves).

Of course, you can combine the pitch and speed adjustments, slowing a song or passage down to, say, 67%, while raising or lowering its pitch any number of semitones. If you track the speed to the pitch (like -12 semitones at 50% speed), you’ll emulate an analog tape deck or turntable.

OTHER FEATURES


Capo provides many other transcribing aids. You can loop any selected audio portion for repeated playback while you shed a given passage. On the left side of the screen (see Figure 2), you have drop-down menus to change the instrument type (bass, mandolin, ukulele and banjo), tuning, and capo (if applicable). These are great translation shortcuts and saves you from doing the math while you’re just trying to hunt notes.

You can also selectively drop chord markers and type in the chord qualities yourself (see Figure 2). After you type in their names, the chords will sound the appropriate quality when you mouse-click them. This chord marker is a nice extra to have, but I’m not sure of its usefulness, at least with regard to transcribing.


Figure 2: On the left side of the screen, drop-down menus let you select among instruments, alternate tunings, and capo placement. You can selectively drop in chord markers too.

Over on the right side are three “Effects.” You can sum the stereo recording to mono and vary the strength of either channel. If you look closely at Figure 3, you’ll see that the slider is pushed to the right, and that the waveform squiggle of the Left channel (the lower one) has been reduced in amplitude. A three-position EQ allows you to better isolate bass, mid, and high frequencies, and you can dial in your own as well. Finally, a useful “vocal eliminator” function helps you reduce somewhat the lead vocals, allowing you to better hear the backing instruments.


Figure 3: The Effects section allows you to perform three useful functions when transcribing: summing to mono (note the reduced amplitude of the right channel in the setting above), EQ, and vocal reduction.

CONCLUSION


The speed and simplicity of Capo are its two greatest strengths. You can loop a passage, slow it down to any percentage of the original, and change the pitch up to two octaves in either direction, if necessary. That’s 95% of all transcribing work, and Capo does this beautifully. If you regularly transcribe using other instruments, and/or with a capo, you’ll appreciate the Note Settings tools. Audio fiddlers will appreciate the Effects section, as it really does give you an extra layer of control, especially for busy or complex mixes. You can even save and export your loops and edited files for others to review or for future reference. At just $50, there’s no reason every musician shouldn’t add Capo to their musical bag of essential software tools.


--------------------------------------------------------------------------------------------------
Liked this? Then Please share this page on Twitter (by clicking on the “Tweet” button) and subscribe to get the top stories of the week, plus the most popular reviews delivered straight to your inbox.

And don’t forget to give us your suggestions in the comments!


View the original article here

2012/01/31

New! Daring Audio Introduces Bass and Guitar Pedal: a Harmonic Exciter and Natural Overdrive, the Edge Activator HD

Belmont, CA, January 2012 -- Daring Audio Inc, the leader in Professional Bass Pedals, today announces a new innovative High Definition (HD) model to broaden its product line. The Edge Activator HD is 100% analog circuitry, has a high-headroom preamp and expanded features and versatility, and a constant volume  continuous wet/dry blend capability between two internal channels.

The original Edge Activator is particularly well respected for accentuating slapping, popping, tapping, and harmonics techniques. The new Edge Activator HD brings enhanced harmonic excitation and natural overdrive, as well as previous “new string sounds” with bite, overtones, and excellent control over frequency response. Based on user feedback, the Daring Audio Edge Activator HD incorporates all these additional new features:

  • Two position EQ midrange toggle switch “EQ-Hi”  for high midrange cut or boost, and “EQ-Lo” for low midrange cut or boost, with carefully selected frequency centers for enhancing the differences due to playing technique changes: for slap, pop, tapping and harmonics on bass. 
  • Expansion of the Range control allowing differing amounts of excited or overdrive frequencies to be added in. This expansion now covers some of the range from our classic overdrive Particle Beam product for added versatility. 
  • Expansion of the Gain control, enabling line level signals for re-amping, previously requiring the Pad switch and now allowing more boost if needed. 
  • A new toggle switch “Crisp/Smooth” where Crisp allows a full range 20-20K Hz for active bright sounds and Smooth provides high-end roll-off for more vintage or classic rock overdrive settings, particularly useful on guitar signals. 
  • The Blend control now goes 100% wet to 100% dry, allowing use of the preamp with or without the effects of blended overdrive and excitation. 
  • The new Edge Activator HD is tested and  sounds amazing on guitar as well; it can make a Les Paul sounding guitar  sound sharp and brilliant like a Stratocaster with extra ping, clarity  and high harmonics, or a Strat sounding guitar sound  thick and full like a Les Paul for smoother leads and more mid-range  chunk and punch by adjusting the EQ knob and switches. Tube like natural  overdrive can be added or subtracted according to taste – with unique  control over which frequencies receive the distortion.

Like all other Daring Audio pedals, this one has 18V  high headroom on a single 9V battery or standard center-negative Boss  style 9V adapter and true-bypass switching. Pricing is $199 for each  pedal. The Edge Activator HD will be available  March, 2012. Pre-orders are available now.

See the website here: http://www.daringaudio.com/namm2012/

About Daring Audio:
Daring Audio, Inc, launched at NAMM 2011, has reinvented bass effect  pedals and established themselves as the best professional high  performance bass pedals on the market.  Daring Audio bass pedals all are  100% analog circuitry, have high-headroom preamps,  two-channel internal signal paths, constant volume continuous blend  innovation, and indestructible case construction with unique laser  engraving of scientific principles on the cases. The pedals preserve the  full bandwidth original sound of your bass (or guitar)  for live or studio applications. Daring Pedals are designed and  hand-made in the California, U.S.A., and have consistently sold out in  their first year production runs.


--------------------------------------------------------------------------------------------------
Liked this? Then share this page and subscribe to get the top stories of the week, plus the most popular reviews delivered straight to your inbox.

And don’t forget to give us your suggestions in the comments!


View the original article here

2012/01/30

An All-Koa Ukulele and Guitar Combo Usher in the Return of Taylor's Builder's Reserve Program

ANAHEIM, Calif.  - Riding a wave of creativity and fresh innovations, Taylor Guitars is readying the release of a very special pairing through the company's Builder's Reserve program: an all-koa tenor ukulele and full-sized matching Grand Symphony guitar. The acoustic coupling offer players an exclusive tandem of instrumental voices that celebrate the musical heritage of the Hawaiian Islands.

Designed by senior luthier Andy Powers, who has designed ukuleles for the likes of Elvis Costello, Taylor Swift and many more, Powers has taken a classic, hand-crafted approach to sharing his love of the ukulele with others. The biggest fan of the uke may be Bob Taylor, who calls it a "guitar player's uke. Anyone who plays guitar can just have fun instantly with this."

With a limited production of 30, each ukulele was hand-built by Powers and features a body length of just over 12 inches and a scale length of 17.25 inches. With its small size, equally diminutive appointments were needed to complement the ukulele. The Taylor team took a page of inspiration from the redesigned Koa series and has included a plumeria flower/island vine fretboard and peghead inlay crafted from blackwood and maple, and accented with a flamey maple rosette. The ukulele comes tuned GCEA for tenor voicing but can accommodate baritone strings and voicing.

The matching guitar in this Builder's Reserve special set is an all-koa cutaway Grand Symphony, which features identical appointments to its smaller counterpart but with one special tone enhancement: solid lining and side braces instead of traditional kerfing on the interior of the guitar. While decidedly more difficult to exact, the result is a guitar that is more responsive and dynamic. The guitar comes equipped with Taylor's Expression System® acoustic electronics.

The company's Builder's Reserve program was started in 2008 to utilize unique, ultra-limited wood sets, which the company has been accumulating in its private reserves over its nearly 40-year history. Each of the all-koa ukulele and guitar sets will come with a full-gloss finish and in their respective cases. The pair will be available at select Taylor dealers as a matched set beginning in late January.
To experience the koa ukulele and Grand Symphony set during the NAMM show, please visit us at the Taylor Showcase in room 213ABC of the Anaheim Convention Center.     

For news from NAMM, please visit: www.taylorguitars.com/events/namm-2012
Twitter: @TaylorGuitars
Facebook: facebook.com/taylorguitars
For additional news from Taylor Guitars, please visit
www.taylorguitars.com/news


--------------------------------------------------------------------------------------------------
Liked this? Then share this page and subscribe to get the top stories of the week, plus the most popular reviews delivered straight to your inbox.

And don’t forget to give us your suggestions in the comments!


View the original article here

2012/01/16

Book Review: "The Blues Guitar Handbook" by Adam St. James

Backbeat Books, an Imprint of Hal Leonard Corporation
256 pages, $29.99 (list)
www.halleonard.com


The Blues Guitar Handbook is appropriately named if only for its format: a 256-page instruction book that includes text, music, tab, chord and neck diagrams, and an accompanying audio CD, all in a spiral binding—which allows it to lay open and flat on a table or music stand. It is designed to be read, and used, by players.

But the musician-friendly format doesn’t begin to tell the story of this excellent reference for blues history combined with step-by-step instruction in all styles, whether it’s acoustic fingerstyle blues from the early 20th-century Delta or blazing lead guitar from modern masters like Stevie Ray Vaughan. In between are thorough explorations of styles and techniques ranging from rhythm, lead, special articulations, acoustic blues, classic electric blues, blues-rock, and jazz blues.

Author Adam St. James, an established blues player and educator, structures the material according to three parts and 12 chapters, or sections. The main parts are Blues Guitar Basics, Mastering a Blues Sound, and Blues Styles Through the Ages. Supplementary material makes navigating the book a breeze, allowing for a linear, start-to-finish read, or a more modular approach, where you may want to jump from, say jazz blues, to a discussion on blues scales.

BACK TO THE ROOTS


Though it’s referred to as the “Introduction,” the first 40 or so pages are devoted to an in-depth chronological survey of the blues, starting with the blues’ humble beginnings in the South Central U.S. in the early 20th century. From there the story moves to the post-War migration north to the big cities, where the electric blues of Muddy Waters, Howlin’ Wolf, and B.B. King prevailed. Then it’s on to the blues-rockers of the '60s and '70s, including Eric Clapton, Jeff Beck, and Jimmy Page, and Stevie Ray Vaughan, before bringing us into the modern day with Keb’ Mo’ and Duke Robillard.

This introductory section of the book is richly illustrated (see Figure 1) and quite uncommon for an instruction book. But it’s an excellent addition that helps readers understand the context in which the following instructional material fits.


Figure 1. A richly illustrated history appears at the front of the book, giving readers a good grounding in the blues before the instructional material begins. Note the spiral binding (extreme right), which allows the book to lay completely flat on a table-top or music stand. (Click images to enlarge.)

YES SIR, YES SIR, THREE PARTS BLUES

After the introduction come the instructional parts. Part 1 gets guitarists oriented to basic instructional practices as they relate to the blues. This includes the definition of terms and the basic of music theory, including identifying major and minor scales, and the building of chords.

Part 2 begins the real meat of the instructional stuff, and breaks down the four sections into two on rhythm and two on lead. This is very well-organized material, which is presented in a linear fashion that would make a good lesson plan for any student interested in a structured approach to the complementary techniques of the blues: rhythm and lead. Part 3 is a study of different styles through the ages, including acoustic blues, slide, classic electric blues, blues-rock, and ending with jazz blues. Supplemental material includes a discography (but there is no index).

The lesson material is easy to absorb, due to its elegant layour. Take a look at Figure 2, which shows a typical approach to rhythm playing. The music is presented in a double-staff system that shows standard music notation and tablature. The text explains how to execute the rhythms, strums, and any techniques involved, while the chord diagrams (see the right hand page) complete the visual presentation.


Figure 2. Rhythm guitar examples are presented in standard music notation as well as tab, and chord diagrams (on the right-hand page) show neck diagrams.

Here’s another example of the excellent visual presentation and integration of graphics and text, this time for a lead guitar example. Figure 3 shows the notation (complete with special symbols for showing guitar-specific techniques such as bends, vibrato, hammer-ons, pull-offs, and slides), along with the scale pattern on a neck diagram (on the left-hand page).


Figure 3. Lead guitar music is notated in detail, including bends and slurs, and shows neck diagrams with scale patterns.

Beginning in Part 2, every written music example is performed on the accompanying audio CD. The tracks consist of a count-off (allowing you to play along in time), a drum track, and the featured guitar. A handy track sheet allows you to locate on the disc every example (more than 120) in the book. These are performed by the author, and the sound quality, as well as the performance and tone, is top-tier stuff. Check out Track 86 from the CD, a dead-nuts-on rendition of classic Clapton, from the section on blues rock:

Track86.mp3

Other styles are just as adroitly captured, including those of Robert Johnson, B.B. King, Stevie Ray Vaughan, T-Bone Walker, and Robben. I mean, St. James just nails it.

My only criticism is that in the lead section, the performed rhythms often don’t line up with those in the notation (though the pitches do match perfectly). This means that as transcriptions, the written figures are not completely accurate. But either the notation’s version or the recorded one are equally viable in terms of an authentic interpretation of the riffs and licks presented in the lead section. Author St. James provides excellent explanations of the various theoretical concepts at work, including the different scales and hybrids (six-note blues scale, major-pentatonic, mixo-blues, etc.) used in the excerpts and solos.

CONCLUSION

This book covers all the bases, in terms of the scope of its subject matter as well as the depth of its instructional approach. In The Blues Guitar Handbook, you can devote yourself to any aspect of blues guitar, from creating a good rhythm groove to learning the scales that make up the different blues sounds to capturing the authentic sound of a particular style or era. And when you’re not playing from the tutorial sections, you can deepen your knowledge of blues history and codify your understanding of all things blues guitar from well-written instruction that graces every page of this fine book.

-----------------------------------------------------------------------------------------------------------
Liked this? Then share this page and subscribe to get the top stories of the week, plus the most popular reviews delivered straight to your inbox.

And don’t forget to give us your suggestions in the comments!


View the original article here

2012/01/12

Guitar Doubling Tactics & Strategies

Tips and tricks for getting different tones when recording multiple guitarists, and overdubbing multiple guitar parts


By Phil O'Keefe

I went over the basics of guitar amp miking in my Guitar Amp Miking 101 article, so if you need a refresher on basic mic techniques, please have a quick look. In this article, we'll be going into greater depth regarding multiple-guitar parts in recordings. It's not uncommon for recording engineers to face situations where the band being recorded has two guitarists, or when a single guitarist (maybe yourself) wants to track multiple guitar parts for a single song. This can help add interest and variety to the mix, but in some situations, it can lead to trouble; if you don't watch what you're doing, you could end up with cluttered and muddy mixes, difficulty in differentiating the parts, or even overly-complex arrangements that confuse the listener. Here are some tips and tricks to help you get around some of these common issues, and help you give each guitar its own distinctive identity when recording multiple guitar parts.


TAKE STOCK

Have a look at the rigs you'll be working with and make some notes. If possible, do this well in advance of your tracking session. This will help you spot any potential issues in advance, while there's still time to correct them -- such as instruments with poor intonation, or bad action and buzzes. And of course, have any problems repaired before the session. Also remember that amplifiers are essential parts of the instrument we call "electric guitar," and make sure they're in excellent health too. Any bad speakers, ground issues or weak or microphonic tubes should also be repaired or replaced.

Don't forget to ask about any alternative resources they might have available. Just because something isn't a part of their usual "live rig" doesn't mean it won't be useful for a recording session. Practice amps, amp sim pedals, different guitars and effects can all provide alternative sounds for different parts on the recording. However, be careful not to go into the studio with a pile of unfamiliar gear -- while a new toy or two (or even three) can be inspiring on a recording session, too much unfamiliar gear can lead to option overload and anxiety; it's better to have a good idea of what tones you want (and how to get them) before you enter the studio, rather than being overwhelmed by an endless sea of "almost but not quite" and "that's close, but maybe I can find something I like better" options and decisions in the studio.  Trust me, you'll face enough decisions in the studio already, so save yourself the trouble and make as many in advance as you can.


HAVE A PLAN

Based on the resources at your disposal and everyone's goals, have a plan for the tracking session. It doesn't have to be super-specific, with every detail and moment of time spelled out, but a good general idea of what you're looking for is important. Compare your plan with the available gear list. If your plan calls for gear that isn't already available, make arrangements to rent or borrow what you'll need for the tracking session.

The arrangement is absolutely crucial to the success of any recording project. This is where pre-production can be a real lifesaver. The band should have a good idea of the parts and the arrangements they want to use on their recordings, and just as importantly, so should the producer and engineer. Attend some pre-recording rehearsal sessions to get an idea of the arrangements, and work through any potential problems well in advance. Home recording rigs can really come in handy for pre-production arrangement ideas. The goal isn't to track the ultimate parts at home, but to work out arrangements in advance. This allows you to figure what does and doesn't work for the song, and do it when the clock isn't ticking and the pressure is far less intense. It also allows you to work on your overdub ideas and have them well rehearsed in advance of the session - all of which will save you time and money when you go in to "do it for real." Make sure you don't try to over-extend yourself. It's not uncommon to have players struggle to lay down a "killer part" that is just beyond their technical abilities, but that lives up to some nebulous ideal they have in their mind… then really struggle when they try to double-track it. In those situations, artificial doubling methods may be in order. An even better option is to rehearse in advance; being realistic about your abilities and adjusting your parts accordingly. Ideally you should be confident and capable of nailing any part on the recording within a couple of takes. If you need more than three, you may be over-reaching. Simplify the part or plan on using another way of doubling it.


SPECIFIC TIPS

Sometimes you want to have two tracks blend into one composite sound, which is relatively easy to do by playing the two parts as identically as possible, on similar rigs and panning them to the same location in the stereo field. It's far more likely you'll run into situations where you want to differentiate the two guitars, and allow each to be plainly heard. Sometimes this is as simple as panning each to a different spot in the stereo sound field, but there's a lot more options available to you beyond mere panning. Here are some specific suggestions that can help when tracking multiple guitar parts.


CHANGE THE GUITAR

Doubling the part with the exact same rig can often lead to muddy parts. Instead, try switching instruments. Use a baritone for the doubled part, or even an acoustic guitar.  Something as simple as substituting a Strat on the overdub instead of re-using the ES-335 can often be enough to give each guitar its own identity, and can add extra thickness and dimension compared to doubling with the same setup.


Figure 1: Sometimes getting a different guitar sound is as simple as using a different guitar. Try using a Tele for the doubled part instead of re-using the Les Paul (Click on images to enlarge)


CHANGE YOUR APPROACH TO PLAYING THE GUITAR

Even if you don't have access to multiple guitars, all is not lost. By arranging the parts differently, you can still give each their own voice and identity. By using different intervals and chord inversions, or capoed and uncapoed parts, you can move each part into its own frequency range and sonic space - even if they're playing rhythmically identical parts. Using different picks, tunings and alternate playing techniques such as slide and e-bow can provide additional layering options to explore.


CHANGE THE AMP

You can get a nice change of tonality by simply using a different amplifier for the overdubbed part. Try a Marshall instead of your usual Fender. If you're not sure what to look for in terms of different amp sounds, look for something with a different type of tubes. If your amp uses EL34 or EL84 tubes, try to borrow one with 6L6 or 6V6 tubes. If you use tube amps, try a solid state amp as a tonal alternative to your usual setup.
Don't forget speaker cabinets!  Different speakers can make a big difference to the sound of a guitar amplifier, as can closed-back cabinets vs. open-backed models. In addition to amps and speakers, don't overlook the wide range of alternatives that are available to you with amp simulator pedals, desktop units and plugin software. While these may or may not provide you with your normal "ideal tone", they can provide a staggering range of alternative tones that can be great for layering.


Figure 2: If you used an EL84 based amp like the Marshall Class 5, try using a 6V6 based amp like a Fender Princeton for the overdubs


CHANGE THE RECORDING SIGNAL PATH

Did you use a ribbon mic for the basic tracks? Then try a condenser to bring out the shimmer and treble for that arpeggiated overdub part. Use a dynamic mic on one amp for the first part, and then a ribbon or condenser on a different amp when "doubling" that part. Don't forget that different microphone and preamp pairings can provide different tonalities too.


CHANGE THE ACOUSTICAL ENVIRONMENT

When doing an overdub, consider putting the amp into a different room, or moving it to a different location within the same room in order to give it its own acoustical "space." You can also vary your microphone placement in order to change the ratio of dry, direct from the amp sound vs the room ambience; moving the microphone closer for a drier and more immediate sound or further back for a more distant and spacious sound. Remember - the further from the sound source you move the mic, the more "distant" the sound will tend to be in the mix. Blending close and distant microphones on doubled guitar parts can provide you with a huge sense of depth.


CHANGE THE SETTINGS

If you don't have multiple guitars and different amps, it may be more challenging, but all is not lost! You can always try different control settings on the guitar and amp that you do have to get different tones on the overdubs and layers. If you are limited to one guitar, try a different pickup setting for the overdub. If you only have one amp, try different gain and tone settings. Different effects pedals can be especially helpful here -- especially overdrive and distortion pedals with "amp-like" tonalities. Fulltone, Catalinbread, ZVex, Tech 21 and many other companies make pedals that are designed to make your Fender amp sound more like a Marshall, or a Vox, or a Hiwatt. While not always identical to the "real thing", they can provide some very cool alternative tones of their own, and a taste of those other models, and at a much lower cost than a large amp collection.


CHANGE THE EFFECTS

As a general rule of thumb (and when it comes to recording, remember that rules are made to be broken whenever doing so makes things sound better), I feel that busier parts and more complex chords should usually be drier and have less effects and reverb overall. Leads and other single note lines can usually have more effects on them, depending on the part. Long, sustained parts and ringing arpeggios can go either way. The point is, by adjusting the level and type of effects, you can give each part its own sound and sonic "space," or provide extra texture and thickness to layers and stacked parts. For example, try recording the first pass completely dry, and then kick on a chorus pedal for the overdub.

Speaking of effects, if you have a great tone happening, by all means, track it. However, be aware of the amount of effects you're using and don't go overboard - you can't get rid of it after the fact. It's for that very reason that many engineers wait to apply a lot of effects until the mix - things like reverb and tempo based effects can be added later, and often the plugins and rack units will have better sound than the pedals for these sorts of effects anyway. They're certainly easier to "tempo sync" than most pedal based effects.


IN THE MIX FIXES

It's far too tempting to rely on the old idea of "we'll fix it in the mix", and while tracking it right to begin with nearly always beats trying to fix things later, sometimes you have no choice. If you can't re-track the parts, then you can use some of the other methods to put each one into its own space in the mix. Panning them to different locations in the stereo field can often help. If the parts were recorded with close-mikes (and are relatively "dry"), you can easily add different reverb and delay treatments to each one. Don't forget EQ - you can often cut one frequency range back on one guitar while leaving it alone on the other track. Careful, multi-band EQ adjustments can accentuate certain frequencies of one part while accentuating different frequencies in the second part, giving each their own individual tonality. Another useful tool is the mute button -- just because you have a doubled guitar part recorded for the entire song doesn't mean it's always in the best interests of the song and arrangement to let it run non-stop. Instead, try muting the doubled part on the verses and bring it back in only on the choruses, or on the bridge to give it added impact. Remember that good arrangements should have some flow and variation to them, and shouldn't just sit there without changing… but the time to consider the arrangement is well in advance of the actual recording session. Give some thought and rehearsal to the arrangements before the session and your doubling sessions will be far more productive.


Phil O'Keefe is a multi-instrumentalist, recording engineer / producer and the Associate Editor of Harmony Central. He has engineered, produced and performed on countless recording sessions in a diverse range of styles, with artists such as Alien Ant Farm, Jules Day, Voodoo Glow Skulls, John McGill, Michael Knott and Alexa's Wish. He is a former featured monthly columnist for EQ magazine, and his articles and product reviews have also appeared in Keyboard, Electronic Musician and Guitar Player magazines.


-------------------------------------------------------------------------------------------------
Liked this? Then share this page and subscribe to get the top stories of the week, plus the most popular reviews delivered straight to your inbox.


View the original article here

2011/12/29

Line 6 Wins Electric Guitar Of The Year Award

James Taylor Variax JTV-59, JTV-69 & JTV-89
Press Release: Line 6, Inc. announced today that its James Tyler Variax 69 guitar has won the 2011 Electric Guitar of the Year at the MIA Music Awards.
Voted for by the public, the award was announced at the 2011 MIA Music Awards ceremony, hosted at the London Marriott Grosvenor Square Hotel on Wednesday 30th November.
“We are extremely delighted to win this award. With the involvement of master luthier, James Tyler, we have produced a great guitar that combines the feel of a finely crafted instrument with the flexibility and performance that Variax guitar modelling technology offers.” Commented James Owens, European Sales Director at Line 6.
The Music Industries Association (MIA) Awards are an annual celebration of the musical instrument industry. The awards honour the best selling and most reliable and innovative products in the UK, together with the best people, companies and initiatives in the sector.
James Tyler Variax guitars are available in three styles, each one reflecting the innovative designs of James Tyler in each curve, component and control. Acclaimed for his attention to detail in making custom, hand-crafted instruments for the most discerning players, James Tyler has designed guitars for the world’s most respected guitarists and sought-after session players including Steve Lukather, Michael Landau and Dan Huff.


View the original article here

Line 6 Ships DT25 Guitar Amps


Line 6 DT25 Guitar Amps Press Release:
Line 6 have just shipped the DT25 family of amplifiers, which includes DT25 112 Combo, DT25 Head, DT25 112 Extension Cab.
The new 25W/10W tube amps deliver boutique sound and performance via a uniquely versatile design by renowned amp designer Reinhold Bogner and advanced HD modeling technology from Line 6.
"DT25 is like four boutique tube amps in one,” remarked Elliot Chenault, Line 6 Product Manager.  “Bogner’s innovative design applies reconfigurable analogue components to provide incredible sonic flexibility and the rich tone, feel and touch response his amps are known for.”
The new amplifiers provide guitarists with four guitar amp voicings, or sonic signatures: American clean, British crunch, Class A chime and modern high-gain. Each voicing is the perfect combination of negative feedback loop topology and HD preamp and tone stack modeling. Add to that the reconfigurable operating class (Class AB/25 Watts/Fixed Bias or Class A/10 Watts/Cathode Biased) and power tube mode (Pentode or Triode) and guitarists can dial in classic vintage tones or highly customized originals of their own creation.
The simple, two-channel design provides uncommon flexibility. Each channel is independent – not “clean” or “dirty” – and any configuration of voicing, operating class and power tube mode can be dialled in to either channel. A flick of the A/B switch (or a tap of a latching footswitch) is capable of causing a full analogue and digital transformation.
DT25 amplifiers feature L6 LINK™ jacks for connection to new Line 6 POD® HD multi-effect processors. When connected, the POD HD adds effects, additional amp voicings, foot control and instant scalability (including stereo operation with multiple DT25 amplifiers). The amplifiers’ back panels also feature MIDI I/O, a serial effect loop, multiple speaker outs and a direct out with cabinet simulation, which provides the rich DT25 tone without having to mic the speaker.
DT25 amplifiers feature one 12AX7 and two EL84 tubes, custom-voiced Celestion® G12H90 speakers, and modeled spring reverb with individual level control per channel.
Learn more about DT25 at http://uk.line6.com/dt25/
DT25 112 Combo - £669.99 MSRP inc VAT
DT25 Head - £599.99 MSRP inc VAT
DT25 112 Extension Cab - £199.99 MSRP inc VAT


View the original article here