Showing posts with label Musician Instruments. Show all posts

2012/06/02

Basics of Recording Electric Guitar


Ready to record electric guitar? Before you put your pick on a string, make sure these basics are in place. 


By Craig Anderton

Recording electric guitar is simple, right? You just plug the guitar into an interface’s guitar input, go through a DI box into a mixer, or stick a mic in front of an amp. But there are a few other basic considerations you need to consider first.


THE INSTRUMENT


The type of guitar, choice of pickups, string material, and tone control settings make a huge difference in the overall recorded sound. Get as close as you can to the sound you want by working with these options first, then start experimenting with the mic and amp. Check intonation prior to the session (and whenever you change a string), and check tuning constantly: It’s virtually impossible to fix an improperly tuned or intoned guitar in the mix.


MINIMIZING EMI


Power supplies, transformers, dimmers, and other sources of EMI (electro-magnetic interference) can get into your guitar’s pickups. Turn all dimmers full on or full off. Turn off any gear that isn’t being used. Experiment with the guitar’s orientation with respect to other gear, and choose the position that gives minimum interference.


MICROPHONE TYPE


Dynamic mics (like the Shure SM57) are the “old standby” as they can handle high power levels and have a naturally “warm” tone that complements amps. Large-diaphragm condenser mics are also popular, typically with any pad switch engaged due to a greater difficulty handling extremely high SPLs compared to dynamics.

They also tend to give brighter highs and lower lows. Newer ribbon mics (the image shows a Royer ribbon mic placed close to a cabinet for more bass buildup) are gaining popularity for miking amps, because they’re not as fragile as older ribbon types. They tend to pick up more room ambience, but remember that excessive levels can damage older ribbon mic elements.


MIC POSITION


The relationship of the mic to the amp speaker has a major effect on the sound. Pointing the mic directly at the speaker gives more highs than angling the mic, as a mic’s off-axis response tends to pick up fewer high frequencies. However, where you point the mic also matters; for example, pointing toward the outside of the speaker may give a “tighter” sound than pointing at the center. Also, if a cabinet has multiple speakers, try each one—not all speakers, even ones from the same production run, are identical. The distance from the amp also makes a difference. Placing the mic further away from the speaker picks up more room sound and ambience. For best results, listen in the control room while someone else adjusts the mic; or, adjust the mic yourself, while saying what you’re doing (“Mic pointing at cone, 2" away). Listen back to which sounds best, then re-create the setting you described.


MIC LOW PASS FILTERS


Engaging a mic’s low pass filter, if present, can “tighten up” the sound as it usually affects frequencies below the range of the guitar. This reduces hum and room rumble but doesn’t alter the guitar tone.


RECORDING DIRECT


To preserve your guitar’s high frequency response and output level, record into an input with a high impedance (at least 100, and preferably 220, kilohms). Many audio interfaces have an “instrument input” for this purpose; the illustration (click to enlarge) shows the two front panel guitar inputs for Avid's Mbox (3rd generation). Standard passive direct boxes may not be suitable. If you’re using stomp boxes or other effects prior to your audio interface, its impedance is not an issue: Impedance matters only for the first device “seen” by the guitar.


COMBINING DIRECT AND MIKED SOUNDS


The sound coming from the mic will be delayed compared to the direct sound (approximately 1 millisecond of delay for each foot of distance between the mic and speaker). Combining the direct and miked sounds may sound “thin” due to the comb filtering caused by this time difference. In a DAW, temporarily pan both mics to center and nudge the miked sound forward (earlier) in time to compensate; compare the mix of the two sound sources until you achieve the best tone.


MULTIPLE CABINETS


It’s common to set up two (or more) cabinets and mic both. Variations in the cabinets and miking create a convincing stereo spread when one cabinet is panned more toward the left and the other panned more toward the right.


MULTIPLE MICS


There are two main applications for multiple mics. One is to have a mic (or mics) close to the amp, and one or more mics in the room to pick up ambience and reflections. The other is to place two mics on a single amp and vary the blend between them to create a particular sound. In the latter situation, it’s common to use very different mics (for example, a dynamic and a condenser). During mixdown these can be set to different levels, have one thrown out of phase compared to the other to give “pseudo-EQ” effects, and possibly even have different processing, to create a sound that’s very different compared to using a single mic.


BIG AMPS VS. LITTLE AMPS


Using a big amp and cranking it to get your “sound” will also put lots of reflections into the room where you’re recording, and when these are picked up, may give an overly-diffused effect. You may obtain better results by cranking a small amp, which may sound the same to the mic but not be as loud. This may also be a necessary solution if you’re recording in a location where noise can bother others.


GETTING SUSTAIN WITH RE-AMPING


Re-amping involves recording a dry guitar sound to a DAW, then running it through an amp or amp simulator plug-in on mixdown to allow choosing the perfect tone for the track. However, it also makes sense to play through an amplifier and record both the amp and dry guitar sounds. The amplifier can give more sustain, or even controlled feedback; and if you like the sound, you can always use it and not have to bother with re-amping. An added bonus is that the amp sound will often make a good complement to the re-amped sound, and facilitate creating a stereo image.
Photo courtesy Royer Labs


--------------------------------------------------------------------------------------------------
Liked this? Then Please share this page on Twitter (by clicking on the “Tweet” button) and subscribe to get the top stories of the week, plus the most popular reviews delivered straight to your inbox.

And don’t forget to give us your suggestions in the comments!


View the original article here

2012/02/07

Taylor GS Mini

Travel sized acoustic guitar with full sized playability and a surprisingly big voice
http://www.taylorguitars.com/guitars/acoustic/gs-mini
$679.00 MSRP, $499 "street"


By Phil O'Keefe

Travel guitars are an interesting, if somewhat niche product. They allow many guitarists the ability to take a guitar with them in situations where a full-sized instrument might be too cumbersome or obtrusive, but their playability is often a bit of a compromise due to very short scale lengths and narrow fingerboards, and their small bodies often produce less than inspiring sound quality. However, many musicians are willing to tolerate these shortcomings simply because they have had little choice -- when traveling, a compact sized instrument is easier to take along; you could have big sound, or a small instrument, and you couldn't really get both -- until now.


Figure 1: The Taylor GS Mini (click on images to enlarge)

Taylor is no stranger to travel guitars. Their own Baby Taylor model has been a big success and a part of their product line since 1996, and for the past few years, I myself have been fond of keeping one handy when working in the studio -- not only for it's own unique and slightly quirky recorded timbre, but also as a guitar I can grab and use to quickly demonstrate musical ideas and suggestions to other musicians. As handy and as useful as the Baby has been, it does have some limitations; most noticeably, it doesn't offer the volume and projection of a full sized instrument, nor anywhere near the full range frequency response of a large guitar. Taylor took the features that made the Baby so popular and expanded on them with the GS Mini, with the intention of creating a guitar that could serve equally well as a travel companion or modern-day parlor guitar for use around the house. Based on my experiences with the review unit, I'd say they nailed those goals.


CONSTRUCTION AND MATERIALS

The GS Mini is a classy looking little guitar, with a definite Taylor vibe to the aesthetics. The solid sitka spruce top has a satin varnish finish and is bordered by black / white / black purfling around the edges, which matches nicely with the black and white three-ring rosette around the full-sized 4" soundhole. A tortoise pickguard with a familiar Taylor styled shape is also included, and like the Baby, the GS Mini has a black Lexan laminate on the front of the traditional Taylor shaped headstock, with the Taylor logo displayed at the top. The truss rod adjustment is also located at the headstock, and is hidden under a black plastic cover. The black headstock face visually ties in nicely with the GS Mini's ebony fingerboard and bridge.

The two piece, bookmatched solid sitka spruce top has some dark figuring here and there in the wood - it's not as even in color as the spruce on some of Taylor's high-end models, but the bookmatching means the patterning is uniform, and while looks are subjective, I thought it gave the guitar some unique and individual visual appeal. (Figure 2) The top is X braced, and careful examination of the interior with a light and a dental mirror revealed scalloped braces and clean construction, with no unexpected gaps or globs of glue.

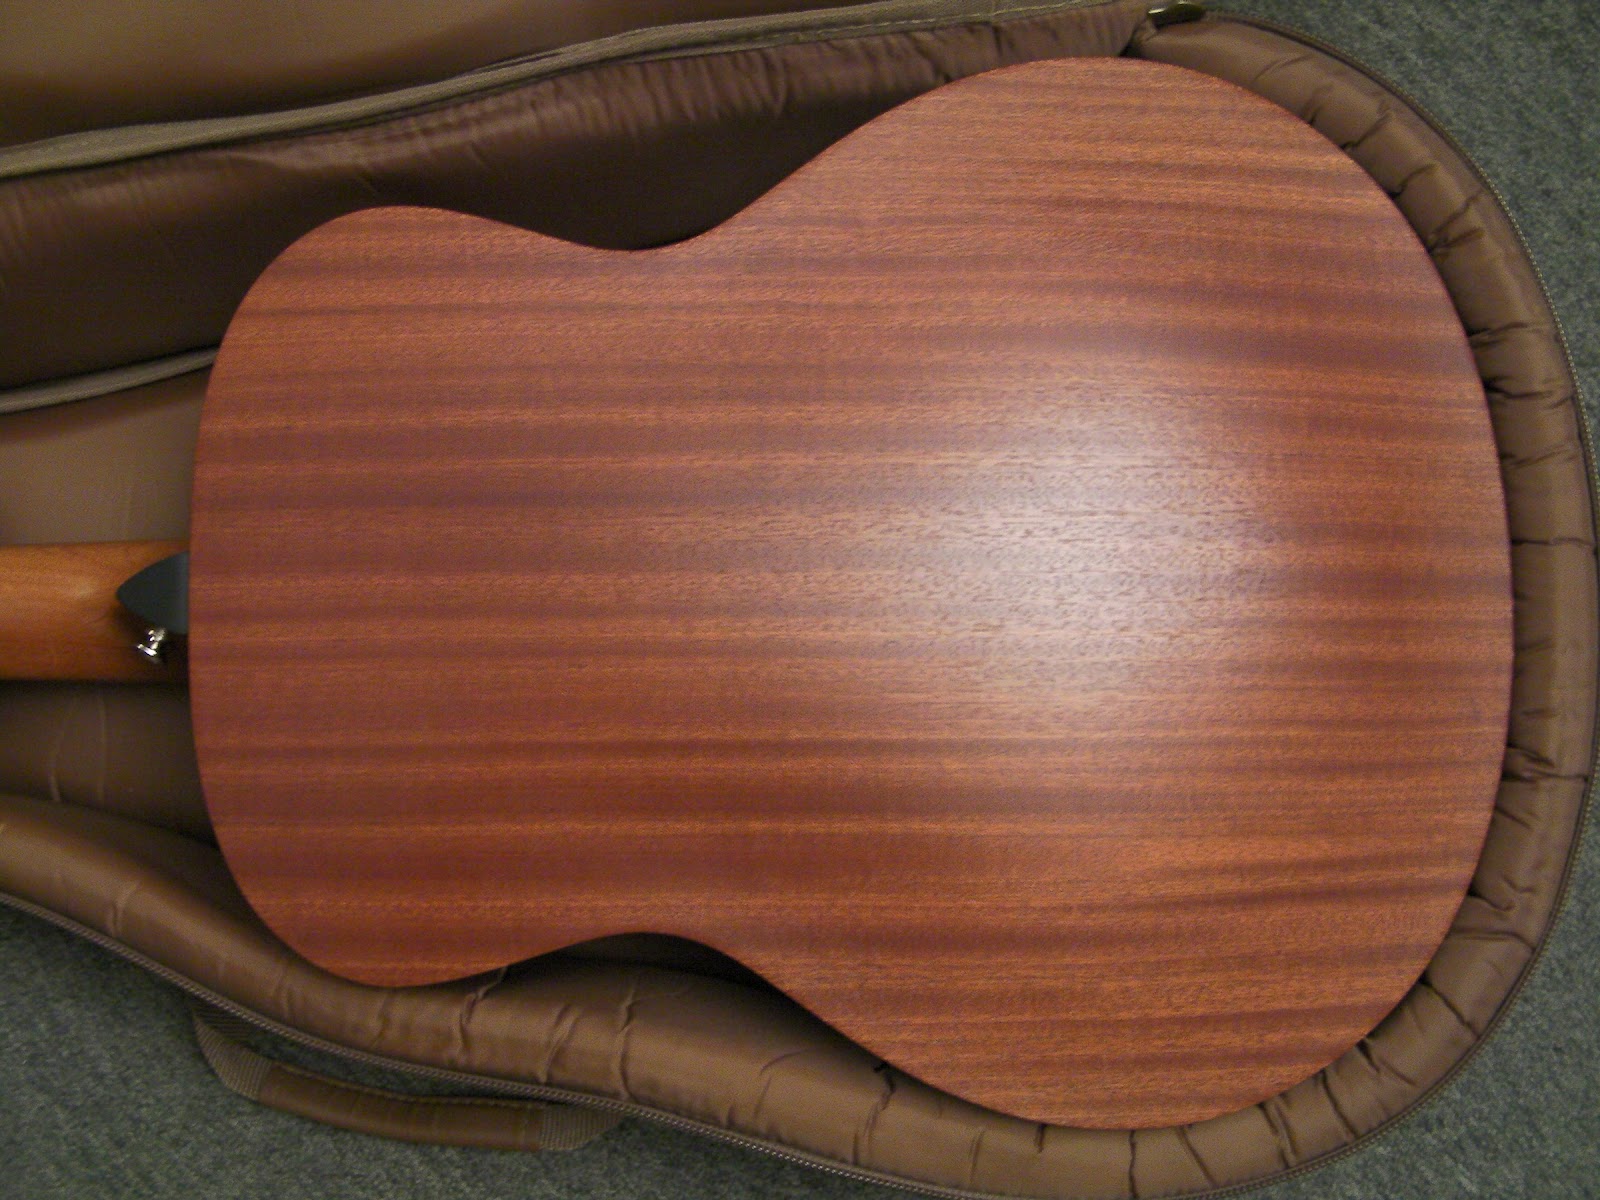
The body is a scaled down version of Taylor's own GS, or Grand Symphony body style. There is some open-pore grain texture to the satin varnish finished African sapele laminate back and sides. The back is arched and braceless. The body wood has some striping to it -- areas where the shading is subtly darker and lighter; similar to figured maple, but with much wider bands. (Figure 3) The appearance is not unlike the highly figured American mahogany on my Taylor 510, and the similarities go beyond the cosmetic - the overall tone of sapele is also very close to mahogany, although with a touch of added "zing" to the highs, in a manner similar to maple. The resulting tone of the GS Mini has a bit of midrange emphasis, and is articulate and bright in the treble, with excellent note definition. The full depth (4.5") body and full-sized sound hole gives it a bigger, deeper bass tone than the small body length and width would lead you to believe, but it lacks the beefy wallop of a full sized jumbo or dreadnought. Still, I was pleasantly surprised by just how full the bass is. There's a brilliance to the bass notes that really speaks nicely on bass register runs and alternating bass accompaniment.

The slightly open grained satin texture extends to the solid sapele neck, although it doesn't affect the smooth feel or playability, which I would describe as being very fast and nearly effortless. Taylor's patented NT Neck supports the fingerboard even in the area over the guitar's top, and allows for easy adjustability of the neck angle, and even eases neck resetting and replacement if the need arises. Neck width at the nut is 1 11/16" which is a fairly standard size. I didn't feel like my fingers were cramped into a overly narrow fingerboard. This is important, because in conjunction with a shorter scale length, a too-narrow fingerboard can lead to playing difficulties. Thankfully, Taylor kept the fretboard width full-sized. The nut and compensated bridge saddle are made out of NuBone, a synthetic material from GraphTech. NuBone is a derivative of their proprietary TUSQ man-made "ivory" material, with similar tonal properties.The sealed tuning machines bear no branding marks, but have a similar look and feel to some of Schaller's tuners. Regardless of who makes them, they feel very smooth and held their tuning just fine.


Figure 2: The review unit's bookmatched Sitka Spruce top


Figure 3: The laminated Sapele back and sides are nicely figured. Note the thickness of the padding on the included "hard bag"


PLAYABILITY AND SOUND

Let's get right down to it -- the GS Mini plays, responds and sounds far more like a "real" acoustic" than a "travel guitar." Compared to the Baby Taylor (Figure 4), the GS Mini is capable of getting quite a bit louder, and can easily hang with full sized instruments at informal jam sessions in the backyard or living room without compressing and bottoming out. In fact, the guitar is surprisingly touch sensitive, and responds equally well to being played with gusto as much as it does to being delicately caressed. This outstanding dynamic response is fairly uncommon in smaller guitars, and is a big part of the Taylor's appeal from a playability standpoint.

The shorter 23.5" scale length feels compact, but not nearly as closely spaced as the 22.75" scale of the Baby Taylor models. The stock strings are also heavier; a medium gauge set of Elixir Nanowebs. While this may be heavier than many players are used to using, the feel is offset by the lower tension of the short 23.5" scale length. Coupled with the comfortable neck, the feel is surprisingly "electric" and extremely easy to play, inviting you to explore the entire length of the fingerboard. The big strings under lower short scale tension also helps add fullness and warmth to the tone. The guitar arrived tuned to standard E tuning straight out of the box, and unlike some acoustic guitars, is designed to handle standard tuning with medium gauge strings without risk of damage. The action is exceptional. It's low and consistent up and down the entire length of the neck. Electric players should feel quite at home on it, and the fast neck makes this a good choice for a backstage / dressing room warm-up guitar. Of course, the small size will also work well in cramped tour bus quarters too.

The guitar works equally well when played with a flatpick or fingerstyle. The voice is crisp and clear, with fullness in the bottom but no boominess or mud. The dynamic response to changes in the force of the player's touch is outstanding, and it's really easy to go from soft and delicate tones to a shockingly loud full volume roar when strummed or plucked hard. There doesn't seem to be nearly the same degree of compression and volume limiting when the guitar is driven hard - unlike many small bodied travel guitars. While the sound lacks the booming bass of a full-sized dreadnought or jumbo bodied guitar, there is a lot more fullness to the sound than you might expect based solely on its relatively small dimensions. Taylor attributes this to the larger soundhole and deeper, full-sized body depth. Whatever the reasons, many players are pleasantly surprised by the tonal balance when they first play a GS Mini. To capture that sound when recording, I found that traditional mic techniques, such as a condenser at the 14th fret, worked well, but I felt I had the best results with a good pair of small diaphragm condensers in an XY stereo setup placed about 8 - 12" directly in front of the soundhole.


Figure 4: A size comparison -- the GS Mini, a Taylor 510 Dreadnought, and a Baby Taylor


OPTIONS AND ACCESSORIES

The GS Mini was designed to accept the optional ES-Go pickup. This is a magnetic stacked coil humbucking pickup that "floats" at the front of the soundhole without actually coming into contact with the top. According to Taylor, it can be easily installed by the guitar's owner using factory-installed fixtures inside the GS Mini. All of the mounting clips are already pre-installed, and adding the ES-Go requires only a few minutes and a small screwdriver. When coupled with Taylor's V-Cable, which incorporates a built-in volume control into a right-angle 1/4" plug, this gives the player a built-in pickup and a volume control at the output jack, which is located at the rear strap button. Unfortunately, I was unable to test these as part of this review (although I hope to do so in a separate review in the near future), but with even a casual look inside the GS Mini it's easy to see the mounting clip for the optional pickup and the tie-down points for the interior wiring.

One thing that isn't optional is the case. The included "hard bag" is stiffer than many gig bags, and nicely padded. In addition to standard handles, there is a pair of adjustable shoulder straps that allows you to carry the instrument hands-free as a "backpack." The hard bag also includes a decent sized external zippered pouch that's perfect for packing your strap, tuner, cables, spare strings and whatever other accessories you decide to take with you. (Figure 5)


Figure 5: A travel guitar needs a good case, and the GS Mini comes with a heavy duty and highly padded "hard bag"
TAKE ONE WITH YOU

As a "travel guitar", the GS Mini works quite well. It's not much longer than the Baby Taylor (36 5/8" vs the Baby's 33 3/4" length), so fitting it into overhead bins on airliners shouldn't be a problem. It also makes really nice beach or campfire guitar. Due to the solid spruce top, I'd want to give at least some care to avoiding extremes of temperature (and proper humidity conditions are important to any solid wood guitar), but the laminated back and sides seem fairly sturdy and up to the rigors of on-the-go use. The included "Hard Bag" is also helpful here, with the included "backpack" straps allowing you to wear the guitar on your back when hiking or biking - just don't fall!

If you pressed me for a single word to describe the GS Mini, it would be "seductive." Time and time again, I found myself drawn to it; picking it up and playing it at a moment's notice and for just the sheer fun of it. I have not had this much pure playing fun with an acoustic guitar in quite a while. Not only is it super-easy to play due to the shorter scale length, fast neck and low action, but the voicing is far more full-range and inspiring than most travel sized instruments, which further reinforces its allure. This is a guitar that has appeal beyond the strict limits of the typical "travel guitar", and I can see it becoming a favorite of younger students, those with smaller hands, and even those of us who are accustomed to playing full-sized acoustic guitars but who want something in a handier size to keep at the office, sitting on a stand next to the couch, or to take with us when we travel. It's not just great for the journey, but a terrific musical companion once you arrive.

Specifications:
Shape: GS Mini
Finish: Satin Varnish
Back / Side Wood: Sapele Laminate
Top Wood: Sitka Spruce (Solid Mahogany available as an option at no additional cost)
Bracing: Scalloped X-Bracing with Relief Rout
Neck: Sapele
Fretboard: Ebony
Fretboard Position Markers: 5mm Dots
Number of Frets: 20
Tuners: Die-cast Chrome
Headstock Overlay: Lexan
Nut & Saddle: NuBone (TM)
Bridge: Ebony
Bridge Pins: Plastic
Overall Length: 36 5/8"
Scale Length: 23.5"
Body Length: 17 5/8"
Body Width: 14 3/8"


--------------------------------------------------------------------------------------------------
Liked this? Then Please share this page on Twitter (by clicking on the “Tweet” button) and subscribe to get the top stories of the week, plus the most popular reviews delivered straight to your inbox.

And don’t forget to give us your suggestions in the comments!


View the original article here

2012/01/30

Alesis Releases Three New USB MIDI Keyboard Controllers

ALESIS ANNOUNCES THREE NEW USB MIDI KEYBOARD CONTROLLERS: Q61, QX61 AND QX25


New controllers bring together combinations of keys, pads, knobs and faders with something to inspire the creativity of nearly any musician.

Cumberland, R.I. – Alesis, maker of tools and instruments for today’s music makers, introduces the Q61, QX61 and QX25 USB MIDI keyboard controllers. Alesis will unveil the trio of new controllers at booth #6400 of the 2012 NAMM Show from January 19-22 in Anaheim, California.

The Q-series USB MIDI controllers are the no-nonsense way to add expressive MIDI control to any production or performance. Each controller features USB MIDI for easy connection to Mac, PC, iOS devices* and traditional MIDI hardware modules, samplers and synthesizers.

The Q61 is a 61-note keyboard controller that works with virtually any music software and MIDI hardware devices. With velocity-sensitive keys, the Q61 offers a five-octave range of expression in a sleek, portable controller, built for the studio or stage. A full array of essential controls is onboard, including pitch and modulation wheels, octave up and down buttons, an assignable data slider, and the ability to send program changes from the keys.

The QX25 and QX61 are 25-note and 61-note keyboard controllers, respectively, that deliver powerful tactile control over any parameter of any favorite music software. Both controllers enable musicians to punch out a drumbeat on great-feeling pads, open up a filter with smooth, tight knobs, or adjust volume and playback of sequencing software with long faders and snappy buttons. The QX25 and QX61 bring immense parameter control and velocity-sensitive keyboards that get the composer’s hands off of the mouse and into the action for a more efficient, visceral music-making experience.

Whether someone is looking to trigger drum samples, tweak a software synthesizer or adjust individual tracks in a mix, the QX25 and QX61's extensive layouts ensure appropriate feel and proper response thanks to their eight sliders and rotary knobs, four backlit drum pads and dedicated transport controls.
“What began with the Q49 has now grown into a family of controllers with sizes and configurations for any musician to capture their performances,” said Dan Radin, Product Manager, Alesis. “Whether you need the simplicity of the Q61, the power of the QX61 or the compact punch of the QX25, there’s a perfect Q-Series companion for every musician.”

The Q61, QX25 and QX61 will be available in Q2-2012 from musical instrument and pro audio retailers with U.S. estimated street prices of $149.00 (Q61), $199.00 (QX61) and $99.00 (QX25).
*Requires USB adapter, sold separately as part of the Apple iPad Camera Connection Kit. iPad and iTunes are trademarks of Apple, Inc. registered in the U.S. and other countries.

--------------------------------------------------------------------------------------------------
Liked this? Then share this page and subscribe to get the top stories of the week, plus the most popular reviews delivered straight to your inbox.

And don’t forget to give us your suggestions in the comments!

View the original article here

An All-Koa Ukulele and Guitar Combo Usher in the Return of Taylor's Builder's Reserve Program

ANAHEIM, Calif.  - Riding a wave of creativity and fresh innovations, Taylor Guitars is readying the release of a very special pairing through the company's Builder's Reserve program: an all-koa tenor ukulele and full-sized matching Grand Symphony guitar. The acoustic coupling offer players an exclusive tandem of instrumental voices that celebrate the musical heritage of the Hawaiian Islands.

Designed by senior luthier Andy Powers, who has designed ukuleles for the likes of Elvis Costello, Taylor Swift and many more, Powers has taken a classic, hand-crafted approach to sharing his love of the ukulele with others. The biggest fan of the uke may be Bob Taylor, who calls it a "guitar player's uke. Anyone who plays guitar can just have fun instantly with this."

With a limited production of 30, each ukulele was hand-built by Powers and features a body length of just over 12 inches and a scale length of 17.25 inches. With its small size, equally diminutive appointments were needed to complement the ukulele. The Taylor team took a page of inspiration from the redesigned Koa series and has included a plumeria flower/island vine fretboard and peghead inlay crafted from blackwood and maple, and accented with a flamey maple rosette. The ukulele comes tuned GCEA for tenor voicing but can accommodate baritone strings and voicing.

The matching guitar in this Builder's Reserve special set is an all-koa cutaway Grand Symphony, which features identical appointments to its smaller counterpart but with one special tone enhancement: solid lining and side braces instead of traditional kerfing on the interior of the guitar. While decidedly more difficult to exact, the result is a guitar that is more responsive and dynamic. The guitar comes equipped with Taylor's Expression System® acoustic electronics.

The company's Builder's Reserve program was started in 2008 to utilize unique, ultra-limited wood sets, which the company has been accumulating in its private reserves over its nearly 40-year history. Each of the all-koa ukulele and guitar sets will come with a full-gloss finish and in their respective cases. The pair will be available at select Taylor dealers as a matched set beginning in late January.
To experience the koa ukulele and Grand Symphony set during the NAMM show, please visit us at the Taylor Showcase in room 213ABC of the Anaheim Convention Center.     

For news from NAMM, please visit: www.taylorguitars.com/events/namm-2012
Twitter: @TaylorGuitars
Facebook: facebook.com/taylorguitars
For additional news from Taylor Guitars, please visit
www.taylorguitars.com/news


--------------------------------------------------------------------------------------------------
Liked this? Then share this page and subscribe to get the top stories of the week, plus the most popular reviews delivered straight to your inbox.

And don’t forget to give us your suggestions in the comments!


View the original article here

2012/01/29

Propellerhead Releases Ryan Greene Alt Drums ReFills for Reason

Three new Creator Series ReFills bring renowned rock and punk producer's drum sounds into the hands of any musician


Stockholm, Sweden, January 25, 2012 — What do Megadeth, Jay-Z, Alice Cooper, Gladys Knight, NOFX, Lagwagon, No Use For a Name, Patty La Belle, Tower of Power have in common with Rock Band and Guitar Hero? Legendary punk rock producer and mixer Ryan Greene. And now anyone can be on that list, with three new drum ReFills featuring Ryan Greene’s signature sound. Propellerhead today released the latest installments in its ReFill Creator Series: Ryan Greene Alt Drums.

Ryan Greene Alt Drums comes as three separate volumes, each containing three drum kits with several microphone setups and alternate snares. Each of the three ReFills comes with preset patches for Reason's Combinator device, with three different microphone setups: close mics, no ambience mics, and all mics; Producer Combinator patches with dry, overhead, and room microphone setups; Individual Kit Pieces for the NN-XT sampler; effects patches; as well as 100+ drum track MIDI files created by Ryan Greene. The sounds are fully produced; finished drum kits with kick drums with big bottom and snare drums with punch. Thanks to the premade patches using different  microphone setups and production techniques, no additional mixing is  required from users to get a great sound that sits right in the mix.


“All the sounds have been tested in real applications throughout the recording process to make sure they hold up under heavy fire, which basically means up against huge guitar and bass sounds,” says Ryan Greene.
www.propellerheads.se/products/refills/altdrums/

Ryan Greene Alt Drums ReFills Series:

- Alt Drums I


The  first Alt Drums ReFill features Ryan Greene’s own Pork Pie kit, used on  a lot of Greene’s Punk/Fat Wreck Chords productions throughout the  years, as well as a versatile Gretsch kit and a deep sounding vintage Leedy kit. An additional three  snares are included, ranging from classic rock sound to heavier punk.


- Alt Drums II

The  star of the Alt Drums II ReFill is a 1964 Ludwig Liverpool kit —  recorded and produced as if it was played by the Mötley Crüe, bringing a  sound like no other. This pack also has a vintage Leedy kit customized by the John Covington and a Tama  kit played by Troy Luccketta of the band Tesla. Added are three more  snare drums, including a Leedy from the 1890’s (!)


- Alt Drums III

For  Alt Drums III Troy Luccketta from multi-platinum rock band Tesla played  a one of a kind Camco kit. The aggressive and warm sound of this kit  built in 1956, and all the power that Troy brings when he hits a drum makes it a go-to kit for punk  and rock productions. Included are also a wooden Ayotte kit, and a big  and powerful Leedy kit with a 28-inch kick drum. Three extra snare drums  come with the pack, among them the rare Yamaha Vinnie Colaiuta, and the Dave Weckl signature model. 

Pricing and AvailabilityRyan  Greene Alt Drums Volume I, II and III are available immediately  exclusively as downloads from the Propellerhead online shop for $99.00 USD and €89.00 EUR (including VAT) each.

www.propellerheads.se/go/0897D5BA


--------------------------------------------------------------------------------------------------
Liked this? Then share this page and subscribe to get the top stories of the week, plus the most popular reviews delivered straight to your inbox.

And don’t forget to give us your suggestions in the comments!


View the original article here

2012/01/25

Bereich03 Audio Density

Press Release: Bereich03 Audio is a Munich based company whose first product is a handmade 500 series analog 'soft' saturation device called Density.

Designed by Michael Heilrath, the Density allows subtle or extreme soft saturation/harmonic distortion to be applied during any stage of the recording process.

Featuring 2 distinct switchable voicing options and a 6 way rotary switch, the levels are compensated so that there is no increase between the input signal and the output signal levels.

The units use relays for true bypass and have internal dip switches that allow for input & output level adjustment from -16db to +8db.

Available now as single units or as matched pairs.

For more information contact http://www.bereich03-audio.de/ price €495 (inc VAT) + shipping


--------------------------------------------------------------------------------------------------
Liked this? Then share this page and subscribe to get the top stories of the week, plus the most popular reviews delivered straight to your inbox.

And don’t forget to give us your suggestions in the comments!


View the original article here

2012/01/19

10 Ways to Exploit Synth and Sampler Oscillators

by Craig Anderton

Many synthesizers and samplers, whether hardware or software, combine digital sample-based oscillators with synthesis techniques like filtering and modulation. These synthesis options can turn on-board samples into larger-than-life acoustic timbres, impart expressiveness to static sounds, and create entirely new types of sounds—but only if you know how to do a little editing.

Don’t believe the hype that editing a synth preset is difficult. All you really need to know is how to select parameters for adjustment, and how to change parameter values. Then, just play around: Vary some parameter values and listen to what happens. As you experiment, you’ll build up a repertoire of techniques that produce sounds you like.

When it comes to using oscillators creatively, remember that just because a sample says “Piano” doesn’t mean it can only make piano sounds. As with so many aspects of recording, doing something “wrong” can be extremely right. Such as . . .

1. BOMB THE BASS

Transpose bass samples up by two octaves or more, and their characters change completely: So far I’ve unearthed great dulcimer, zither, and clavinet sounds. Furthermore, because transposing up shortens the attack time, bass samples can supply great attack transients for other samples that lack punch (although it may be necessary to add an amplitude envelope with a very short attack time so that you hear only the attack). Also, bass samples sometimes make very “meaty” keyboard sounds when layered with traditional keyboard samples.

2. THE VIRTUAL 12-STRING

Many keyboards include 12-string guitar samples, but these are often unsatisfying. As an alternative, layer three sets of guitar multisamples (Fig. 1). The first multisample becomes the “main” sample and extends over the full range of the keyboard. Transpose the second set of multisamples an octave higher, and remember that the top two strings of a 12-string are tuned in unison, not octaves. So, limit the range of the octave higher set of multisamples to A#3. Detune the third multisample set a bit compared to the primary sample, and limit its range to B3 on up. (You may want to fudge with the split point between octave and unison a bit, as a guitarist may play the doubled third string higher up on the neck.)


Fig. 1: A simple 12-string guitar patch in Reason’s NN-XT sampler. The octave above samples are colored red for clarity, while the unison samples are colored yellow. (This example uses a limited number of samples to keep the artwork at a reasonable size.)

If you can delay the onset of the notes in the octave above and unison layers by around 20 to 35ms, the effect will be more realistic.

3. THE ODD COUPLE

Combining samples with traditional synth waveforms can create a much richer overall effect, as well as mask problems that may exist in the sample, such as obvious loops or split points. For example, mixing a sawtooth wave with a string section sample gives a richer overall sound (the sawtooth envelope should mimic the strings’ amplitude envelope). Combining triangle waves with nylon string guitars and flutes also works well. And to turn a sax patch into a sax section, mix in some sawtooth wave set for a bit of an attack time, then detune it compared to the main sax.

Sometimes combining theoretically dissimilar samples works well too. For example, on one synth I felt the piano sample lacked a strong bottom end. Layering an acoustic bass sample way in the background, with a little bit of attack time so you didn’t hear the characteristic acoustic bass attack, solved the problem. Sometimes adding a sine wave fundamental to a sound also increases the depth; this worked well with a Chapman Stick sample to increase the low end “boom.” Try other “unexpected” combinations as well, such as mixing choir and bell samples together, or high-pitched white noise and choir.

4. FUN WITH INTERGALACTIC COSMIC EXPLOSIONS

Transpose percussion sounds (cymbals, drums, tambourines, shakers, etc.) way down—at least two octaves—for weird sound effects and digital noises. If this causes any quantization noise or grunge to the sound, you may want to keep it but if not, consider closing the lowpass filter down a bit to take out some of the high frequencies, where any artifacts will be most noticeable. For truly massive thunder effects, spaceship sounds, and exploding galaxies (which are always tough to sample!), choose a complex waveform, transpose it down as far as it will go, and close the filter way down . . . then layer it with a similar sound.

5. GENTLEMEN, START YOUR SAMPLES

Changing the start point of a sample (a feature available on most synths and samplers) can radically affect the timbre and add dynamics. Move the start point further into the sample (Fig. 2) until you obtain the desired “minimum dynamics” sound, then tie the start point time to keyboard velocity so that more velocity moves the start point closer to the beginning of the sample (this usually requires negative modulation, but check your manual).


Fig. 2: The green line indicates the initial sample start point (minimum velocity). Hitting higher velocities moves the sample point further to the left, toward the beginning of the sample, so the sound picks up more of the attack. The red part of the waveform is the area affected by velocity.

This seems to work best with percussive sounds, as changing the start point dynamically can cause clicks that are obvious with sustained sounds, but blend in with percussion. An alternative is to use two versions of the same sample, with one sample’s start time set into the sample and the other left alone; then use velocity switching to switch from the altered sample to the unaltered one as velocity increases.

6. DETUNING: WHO SAYS SUBTLE IS GOOD?

Detuning isn’t just about subtle changes. When creating an unpitched sound such as drums or special effects, use two versions of the same sample for the two oscillators, but with their pitches offset by a few semitones to thicken the sound. You may need to apply a common envelope to both of them in case the transposition is extreme enough that one sample has a noticeably longer decay than the other one.

7. THE REVENGE OF HARRY PARTCH

Microtonal scales (17-tone, 21-tone, exotic even-tempered scales) are good for experimental music, but they’re also useful for special effects. After all, car crashes are seldom even-tempered, and you may want a somewhat more “stretched” sound—either higher or lower—than what the sample provides. To get these kinds of scales (or even a 1-tone scale where all notes on the keyboard play at the same pitch), assign note position (keyboard) as an oscillator modulation source. Adjusting the degree of modulation can “stretch” or “compress” the keyboard so that an octave takes up more or less keys than the usual 12. Note that you may need to adjust the tuning so that the “base” key of a scale falls where you want it.

8. CROSSING OVER

Use waveform crossfading to cover up samples with iffy loops. For example, one keyboard had a very realistic flute sound, but the manufacturer assumed you’d be playing the flute in its “normal” range, so the highest sample was looped and stretched to the top of the keyboard. This flute sound actually was very useable in the upper ranges, except that past a certain point the loop became overly short and “tinny.” So, I used the flute sample for one oscillator and a triangle wave for the other, and faded out the flute as it hit the looped portion, while fading in the triangle wave (Fig. 3).


Fig. 3: As the natural flute loop fades out, a looped triangle wave fades in to provide a smoother looped sound for the decay.

The flute sample gave the attack and the triangle wave, a smooth and consistent post-attack sound. Similar techniques work well for brass, but you’ll probably want to crossfade with a sawtooth wave or other complex waveform.

9. BETTER LIVING THROUGH LAYERING

Try layering two samples, and assigning velocity control to the secondary sample’s amplitude so that hitting the keys harder brings in the second sample. This can be very effective in creating more complex sounds. One option for the second sample is to bring in a detuned version, so that playing harder brings in a chorusing effect; or, you use variations on the same basic sound (e.g., nylon and steel string guitars) so that velocity “morphs” through the two sounds.

10. TAKE THE LEAD WITH GUITAR “FEEDBACK”

With lead guitar patches, tune one lead sample an octave higher than the other lead sample and tie both sample levels to keyboard pressure. However, set the initial volume of the main sample to maximum level, with pressure adding negative modulation that lowers the level; the octave-higher sample should start at minimum level, with pressure adding positive modulation that increases the level. Pressing down on the key during a sustaining note brings in the octave higher “feedback” sound and fades outs the fundamental.
For a variation on this theme, have pressure introduce vibrato and perhaps bend pitch up a half-tone at maximum pressure. Also experiment with other waveforms and pitches for the octave-higher sound; a sine wave tuned an octave and a fifth above the fundamental gives a very convincing “feedback” effect.

Craig Anderton is Editor in Chief of Harmony Central and Executive Editor of Electronic Musician magazine. He has played on, mixed, or produced over 20 major label releases (as well as mastered over a hundred tracks for various musicians), and written over a thousand articles for magazines like Guitar Player, Keyboard, Sound on Sound (UK), and Sound + Recording (Germany). He has also lectured on technology and the arts in 38 states, 10 countries, and three languages.


--------------------------------------------------------------------------------------------------
Liked this? Then share this page and subscribe to get the top stories of the week, plus the most popular reviews delivered straight to your inbox.

And don’t forget to give us your suggestions in the comments!


View the original article here

Korg nanoSERIES2 Controllers

nanoPAD2  $75 MSRP, $59.99 street
nanoKONTROL2  $75 MSRP, $59.99 street
nanoKEY2  $65 MSRP, $49.99 street
www.korg.com
by Craig Anderton

It’s great that laptops are powerful enough to accommodate actual music-making, but they were never designed for interfacing with software like a musical instrument. There’s the "QWERTY-keyboard-as-trigger" option, embodied in Tanager Audioworks’ clever Chirp program and included as a control option in Reason, but forget about velocity, easy playing, faders, or a good feel. Korg’s original nano series was intended to address that need, but now they’re back with their second generation nano controllers—which aren’t just for laptops any more.

Really? Well, it seems space is always at a premium with desktop setups, too. You’re tied to the computer monitor, mouse, and keyboard, and finding the space to put an AGO keyboard in front of your computer keyboard is not always possible . . . so you set up a keyboard to the side, but it may or may not include pads, faders, and other controllers.

But these little guys do. There are three nanoSERIES2 controllers—keyboard, pad controller, and fader box—all available in black or white, and all of which work with USB (they come with a 43” USB cable). You can swap them out as needed as you go through a project, and not have to move from your computer.

Of course, they’ll work with laptops; I presume Korg considers that the primary application. Nonetheless, in the course of doing this review, I’ve found the nanoSERIES2 controllers very convenient for punching out a quick soft synth or drum part, or setting up a mix.

GETTING STARTED

As usual, I first went to Korg’s web site to look for software, updates, etc. You need to go there anyway if you want to take advantage of the free, bonus software offer (lite versions of Korg’s M1 soft synth, Toontrack’s EZ Drummer, and Lounge Lizard, along with a discount coupon for various versions of Ableton Live). I found two drivers, each of which said it was the most recent version (check the dates—the April 2011 one is the droid you’re looking for), an updater for each controller, controller editor, and USB-MIDI driver that needs to be installed for Windows or Mac prior to installing the other elements.

I had a false start on Windows; installing the USB-MIDI Driver is not the same as installing the driver itself, but rather, it installs the program that lets you install the driver. Once I had that figured out, it was smooth sailing. I did the recommended updates, and was good to go.
(Note:Click on any image to enlarge.)

THE KONTROL EDITOR


First things first: What you see in all these devices is not necessarily what you get, because you can do a lot of customization via the cross-plaform Korg Kontrol Editor software. For example, I found the nanoKEY2 velocity response predictable, but there are four possible velocity curves (light, normal, heavy, and constant velocity, where you can specify a fixed value) so you can accommodate a different touch if needed. Furthermore, with the nanoKONTROL2, you can assign the faders and knobs to any continuous controller parameter, and the buttons to notes as well as continuous controllers. Although in general you could actually ignore the editor as the defaults are sensible and work fine, the editor lets you take the degree of control much further.

However, note that the Kontrol Editor will compete with your DAW for MIDI I/O. For example, if your DAW has MIDI in and out assigned to the nanoKEY2, and then you then call up the Kontrol Editor, the DAW will take priority and the Kontrol Editor won’t be able to write changes to the nanoKEY2. The workaround is simple: de-select the MIDI I/O in your DAW, write your changes using the Kontrol Editor, then re-select your DAW’s MIDI I/O to continue using the nanoKEY2 as a controller.

A very useful Kontrol Editor feature is a drop-down menu for choosing particular parameters, and shows the values for all applicable controls simultaneously so you don’t have to call up each button individually to see its assignment. Note that Korg also includes the factory presets so you can always get back to square one if your editing gets out of hand.

Finally, there’s a multiple-level undo function (not just the last change), and you can save particular setups for the various controllers. This would let you, for example, save a separate setup for the nanoKONTROL2 where the solo and mute buttons generate notes, so you could kick out a quick bass line or trigger drum sounds without having to switch over to a different control device.

nanoKEY2


This handy little keyboard has 25 keys, and is 5/8” thick so it’s definitely low profile. Keyboard action is subjective, but the nanoKEY2 turned out better than expected. I say “turned out” because of course, these aren’t real keys, and you have to get used to a somewhat different playing style. Once I did, though, I didn’t find it hard to do single-note lines, and not much more of a hassle to play chords.

There are six buttons. Octave up and down are obvious, but a cool feature is the ranges are color-coded—no color for default, green for an octave up or down, orange for two octaves, red for three octaves, and flashing red for four octaves. I would have preferred a slower flash rate, but no big deal as four octaves off default is something I rarely use.
As you might expect, there’s no pitch wheel or ribbon controller. But, there are pitch up and pitch down buttons, and the implementation is quite clever. With the Editor, you can specify a rise/fall time for the pitch bend, so pressing the button doesn’t necessarily produce an instantaneous change, but rather, your choice of rise and fall times: instantaneous, slow (about 750ms), normal (about 100ms), or fast (about 50ms). Note that this generates the full pitch bend range of values, so if you want to restrict the range, you’ll need to do so with the target instrument.


From left to right: Slow, normal, and fast pitch bend times.

The Mod and Sustain buttons are not limited to those designations—with the Kontrol Editor you can change the controller number, choose momentary or latching mode, set max and min controller values, and choose a “switch speed” as with the pitch bend.


NanoPAD2


The 16 pads are obvious candidates for triggering drums, but they can also send program changes and MIDI continuous controller switch values. However, the grooviest feature here is the X-Y controller—it’s a great addition that adds a lot more options.

Pad assignments are comprehensive. Each can be set to its own channel, alternate between toggle or momentary modes, and have the arpeggiation options enabled or disabled. There’s also a global velocity curve option (same as the nanoKEY2, including the constant velocity option).
As to X-Y options, you can assign the X and Y axis to independent continuous controllers, with choice of normal or reverse polarity. These assignments apply if you drag across the touchpad. Simply touching the pad can send out a continuous controller with variable on and off values.

However, as an alternative to just sending controller messages, there are various gate, scale, and arpeggiation features. In Touch Scale mode, you can trigger notes with constant note-on velocity, based on one of 16 user-selectable scales (including a user-defined scale), simiply by dragging across the pad along the X-axis. The Y-axis sends out a continuous controller of your choice. If you also enable Gate Arp,whatever notes you play will be repeated at the arpeggiation rate, which you can set from 1/48th notes to half-notes. With this mode the Y-axis changes the gate time.

With only Gate Arp enabled, the playing technique involves triggering notes with the pads, and altering those notes with the touch pad where the X-axis controls the arpeggiation rate, and the Y-axis controls velocity.
You can change the range of notes assigned to the touch pad to cover a lesser range with more precision, as well as the octave, but note that the arpeggiation will not jump octaves—gating remains on the selected note pitch until changed. There’s also a Hold button that maintains the last X-Y pad value prior to releasing your finger from the pad.

Finally, given the versatility it’s helpful that you can store four individual “scenes” that are presets of all the parameters you’ve saved. So, you could have one scene dedicated to traditional drum triggering, another optimized for notes, another with the X-Y touch pad as a controller, and another with the X-Y touch pad doing its gated arpeggiator thing. You can sync the tempo to the host, run from an internal tempo, or do tap tempo.

nanoKONTROL2


This has two modes—a Mackie Control-compatible DAW controller, or a general-purpose MIDI control surface. For Mackie control, templates (which you load by holding down particular buttons during nanoKONTROL2 power-up) are included for Cubase, Digital Performer, GarageBand, Logic, Live, Pro Tools, and Sonar. There’s also a general-purpose template for DAWs where specific templates are not included. Note that when you load a template, the Kontrol Editor can’t make changes; it’s for control surface applications only.

The Mackie Control mode worked perfectly in Sonar, including bank-switching with more than eight tracks. It’s really quite cool to have all that control in such a tiny little control surface, and while the 30mm faders have a pretty short throw, they’re perfectly useable.

As a general-purpose control surface, you can create mappings for virtual instruments, signal processors, whatever. For example with Sonar, it was a piece of cake to have the nanoKONTROL2 serve as an ACT device for plug-in parameter control. As with the other nanoSERIES devices, the Kontrol Editor gives you pretty much total freedom for assigning the strips. They can be on different MIDI channels, and you can even set minimum and maximum values for the continuous controller messages assigned to each knob and fader (no, the faders aren’t motorized . . . we’re not in the 22nd century yet). Also, note that any button, including transport buttons, can generate notes.

CONCLUSIONS

I can’t comment on how these would hold up over a year, but so far, the construction quality seems considerably improved over the original nano series controllers. I assume the nanoKEY2 and nanoPAD2 would be particularly durable because of their low profile; of course, the nanoKONTROL2 has knobs that protrude above the surface, so you wouldn’t want them to catch on something but aside from that, it seems an unlikely candidate for damage. The overall playing feel is good, too; as you’d expect the buttons have a little “wobble,” but their action is positive.

The software is also a major plus. Although the controllers can serve as standard, generic devices, the latency seemed very low and I assume that’s because of the Korg MIDI-USB drivers. The Kontrol Editor increases flexibility dramatically, and although it took a little effort to get everything up, running, and updated on Windows, it wasn’t an onerous task and everything is working smoothly.

Of the three it’s hard to pick a favorite, although the nanoPAD2’s inclusion of the X-Y touch pad and arpeggiation options are very cool if you’re into programming beats. Then again, having a Mackie Control-compatible device that fits just about anywhere has definite merit . . . and if you need a keyboard, it’s hard to beat the nanoKEY2 for under $50 street.

All in all, these are a step up and logical evolution from Korg’s original nanos, but to loop back to the beginning, don’t overlook these as adjuncts to a desktop studio. While obviously intended for musicians on the go, they’re useful for any situation with limited space.


Craig Anderton is Editor in Chief of Harmony Central and Executive Editor of Electronic Musician magazine. He has played on, mixed, or produced over 20 major label releases (as well as mastered over a hundred tracks for various musicians), and written over a thousand articles for magazines like Guitar Player, Keyboard, Sound on Sound (UK), and Sound + Recording (Germany). He has also lectured on technology and the arts in 38 states, 10 countries, and three languages.


--------------------------------------------------------------------------------------------------
Liked this? Then share this page and subscribe to get the top stories of the week, plus the most popular reviews delivered straight to your inbox.

And don’t forget to give us your suggestions in the comments!


View the original article here

The Home / Project Studio Microphone Cabinet

Building a versatile and effective microphone collection doesn't have to cost a fortune
By Phil O'Keefe

I love microphones! For a recording enthusiast, they're the equivalent of a photographer's lenses - the devices that capture the raw sonic material that we sculpt into our finished aural masterpieces. Without microphones, your recording project will stall before it ever gets off the ground; unless you're working strictly with samples and virtual instruments, you simply have to have them -- but how many do you need? And with so many models and types available, how do you decide which mikes to get? We're going to try to answer some of those questions in this article.


Figure 1:  A dozen microphones of various types is all you need to handle the vast majority of project studio sessions (Click on images to enlarge)


MICROPHONE TYPES

First, let's look at some of the different types of microphones. There are three main types of microphones you're likely to encounter, each of which functions differently and has different general sonic characteristics. They are condenser microphones, moving-coil dynamic microphones and ribbon microphones.

Condenser microphones use a thin sheet of mylar with a thin layer of gold sputtered on it. This diaphragm is electrically charged, and vibrates when sound waves in the air hit it. The movement of the diaphragm relative to a charged backplate creates an electrical signal. This signal is way too low for your microphone preamp to deal with, so an onboard preamp inside the mic brings that signal up to "mic level." Condenser microphones need either phantom power (usually 48V) to power the onboard electronics, or an external power "brick" to power them if the mic uses a tube circuit. Condensers are very good at capturing fast transients (the initial "start" of the sound), and have a generally bright and open sonic quality to them. They usually have the widest frequency response range. They are also expensive and somewhat sensitive to moisture and physical damage if hit or dropped. Condenser mikes are available in both small and large diaphragm versions.

Moving-coil dynamic microphones are the type that is most familiar to most musicians. They use a thin sheet of mylar as the diaphragm, but with a coil of wire attached to it. A large magnet provides a magnetic field that the coil of wire sits in, and when the air hits the diaphragm and causes it to vibrate, an electrical charge is created through induction. Moving-coil dynamic mikes tend to be fairly inexpensive, relatively rugged and immune to physical shock, wind and moisture, but at the expense of their high frequency and transient response - the relatively massive diaphragms take more sound pressure to overcome inertia. Like condenser microphones, moving coil dynamic microphones are available in both small and large diaphragm versions.

Ribbon microphones are another type of dynamic, but instead of using a coil of wire attached to a mylar diaphragm, they instead use a thin strip of corrugated aluminum that is suspended in a magnetic field. The light weight of the ribbon means that these mikes are generally very good with transients, and their sound is often described as detailed and natural. However, many ribbons have limited high frequency response, meaning you may need to add a bit of high frequency EQ to the sound in some cases. Also, most ribbons have very low output levels, and require a good mic preamp with plenty of gain (60-70dB) on tap. They are also relatively fragile, and a decent blast of wind can destroy the ribbon element. Ribbon mikes are often described as sounding warm and natural, and these characteristics have given them a resurgence of popularity in this age of digital recording.


POLAR PATTERNS

Most readers will probably be familiar with cardioid directional microphones. These mikes are much more sensitive to sound arriving from the "front" and reject sound coming from the rear. However, there are other polar patterns that can be useful for various applications. Besides cardioid, the two other polar patterns you're most likely to encounter are omnidirectional and bi-directional or "figure 8."

Omnidirectional microphones pick up sound that arrives from any direction. They are perfect for capturing the sound of the "room", and they usually have the most balanced sound and "flattest" frequency response. They tend to feed back easily, which is why they're rarely used live, and since they pick up everything, they're not good for isolating individual instruments when recording more than one at a time in the same room. They're perfect for picking up the sound of multiple or "group" vocals, and since they do not suffer from proximity effect, they're excellent for use at near-contact distances from a sound source without sounding boomy.

Bi-directional or "figure 8" microphones like the Cascade Fathead II shown in Figure 2 pick up sound equally well from the front and rear, while offering near-perfect rejection of sounds coming from the sides. This polar pattern is the most susceptible to bass-boost due to proximity effect. Most ribbon microphones have bi-directional polar patterns.


Figure 2: Ribbon mikes like this Cascade Fathead II usually have bi-directional polar patterns and pick up from both the front and rear while rejecting sound arriving from the sides

Having a selection of different polar patterns can be very useful. A good cardioid condenser coupled with a good bi-directional mic gives you the basic tools you need for Mid-Side stereo recording. A pair of bi-directional mikes will allow you to record using the Blumlein stereo mic technique. They can also be excellent for recording a single person performing on acoustic guitar and vocals simultaneously by angling them in such a way that the front of the vocal mic is aimed at the vocalist's mouth, while the side is pointed towards the acoustic guitar, and so that the front of the guitar mic is aimed at the guitar, but the side (where rejection is near-perfect) is aimed towards the singer's head. Large diaphragm condensers with multiple, user-selectable polar patterns are great due to their similar adaptability. Some small diaphragm condensers are available with alternative screw-on capsules (Figure 3) with different polar patterns to expand their polar pattern options.


Figure 3: Some small diaphragm condensers like this Oktava MC-012 have replaceable capsules that allow you to change the microphone's polar response

APPLICATIONS

Large diaphragm condensers are often considered the "stars" of the mic locker, and they can be used on practically anything, although they're often used for the "featured" elements of a recording. Drum overheads and "room" mikes, stereo applications (Blumlein, Mid-Side and spaced pairs), piano, acoustic guitars, lead and backing vocals, strings, brass, reeds and guitar amps are all commonly recorded with large diaphragm condensers. Be aware that sound arriving off-axis can sound "colored", and some large diaphragm condensers can sometimes be too "hyped" sounding in the high frequencies on some sound sources.

Small diaphragm condensers are also good for practically anything. They're commonly used as drum overheads, and for general stereo miking applications; especially for spaced and XY coincident pairs. Other uses include acoustic piano, acoustic guitars, hi hats, percussion "goody table" items and stereo ensemble recordings; especially choirs. They're generally more "realistic" sounding than large diaphragm condensers, with more natural off-axis response, although they do tend to have more self-noise than their larger cousins. Some models will overload when used up close on very loud sound sources. Pad switches that lower their sensitivity are useful in those cases.

Ribbon mikes are slightly more specialized. Ribbons excel as guitar amp mikes, and as drum overhead and "room" mikes. They're also good on brass and sax, as "horn" mikes on a Leslie (™) speaker cabinet, and even for things like banjo and fiddle. On vocals, the tonality can be smooth, detailed and "old-fashioned" or "retro" sounding. Watch out for wind blasts from instruments and singers, and their heavy proximity effect when used at close distances to the sound source.

Large diaphragm dynamic microphones are a good mic type to try whenever you're recording a low-frequency sound source; particularly when that source is very loud. Kick drums, floor toms, bass amps, Leslie (™) speaker drums and low brass instruments like trombone and flugelhorn are good candidates for a
large diaphragm dynamic microphone. They are also very popular for broadcast vocal and narration recording, and can work great for hard rock vocals with the right singer. While they may be more expensive than other moving-coil dynamics, their versatility and low frequency capabilities makes it worth having at least one or two in your collection. Some models are designed specifically for kick, and may have a "scooped" lower midrange response, which may make them less versatile overall. Others such as the RE320 (Figure 4) offer switch-selectable responses for both kick and general purpose use.

Small diaphragm dynamics are the "workhorses" of the modern mic locker. They work well on snare, rack toms, congas, bongos, djembe and other smaller drums, and are the go-to mic for many engineers on guitar amps. If there's a chance of the microphone being banged around or otherwise subjected to a lot of abuse in the recording process, small diaphragm dynamics usually get called in for the job due to their ruggedness and low cost. Their frequency response generally does not reach as far into the highest and lowest ends of the frequency spectrum as most condensers do.


Figure 4: The versatile Electro-Voice RE320 large diaphragm dynamic microphone has a switch that adapts the frequency response for kick miking or general-purpose use

OUTFITTING THE MIC LOCKER AND BUILDING IT UP OVER TIME

As I mentioned in the caption for Figure 1 (above), a well-chosen assortment of twelve microphones will cover 95% of the recording tasks a small project studio may encounter, giving you enough resources to track a typical small ensemble rhythm section of drums, bass and guitar simultaneously; but even with careful selection of versatile, budget-priced / high performance models, a dozen microphones can still cost a significant amount of money. If you can't afford to purchase everything at once, prioritize and get the basics, then add to it when you can. For example, as I pointed out in my Drum Miking Article, you can start with a basic four mic drum setup of large diaphragm dynamic kick mic, small diaphragm dynamic for snare, and a pair of ribbon mikes or small diaphragm condensers for the overheads. Even assuming you have enough mic preamps and input channels on your audio interface, you won't be able to mic other things such as bass, scratch vocals or rhythm guitar simultaneously along with the drums, but each of those "drum microphones" has applications outside of drum kit miking, so when you're ready to do overdubs for rhythm and lead electric guitar, or to record the acoustic guitar parts, you can re-purpose the mikes for those tasks. For example, if you're careful about picking a good multi-purpose large diaphragm dynamic microphone for the kick, it should be able to do double-duty on bass amp cabinets. The ribbon microphones or small diaphragm condensers that you used for drum overheads can be used for acoustic guitar tracking.

When prioritizing, consider the types of recordings you do most often, and make your purchases with that in mind -- then expand from there. If you mainly record fingerstyle acoustic guitar, getting a nice pair of small diaphragm condensers would probably be a wise place to start. If you mainly record voiceover artists, get the best quality large diaphragm condenser and large diaphragm dynamic mikes that you can afford. Guitarists who work alone and rarely record drums should concentrate on a good ribbon mic, a good small diaphragm dynamic, and maybe also consider a large diaphragm condenser for amp room miking duties and a good pair of small diaphragm condensers for the occasional acoustic guitar overdub.

For a general purpose studio on a very tight budget, I'd recommend starting with the four-mike drum setup (with the small diaphragm condenser option for overheads) and a large diaphragm condenser; this will give you the basic tools you need to record practically any instrument singly, and you can add a pair of ribbon mikes and additional dynamic microphones to the collection over time as your budget allows, to expand your ability to record multiple players simultaneously.


SOME SUGGESTED MODELS

Ask any ten engineers what their favorite microphones are, and you'll get ten different lists. Microphone preferences are a personal thing, and getting to know the various models and their sonic characteristics can be a life-long pursuit. Additionally, some of the nicest models can cost significant money -- especially for top of the line condenser and ribbon models, but there are some bargains to be had. Here are some suggestions for models that perform well and yet fall into the "affordable" price range. Some more expensive models are also listed to give you additional choices.

Large diaphragm condensers: Blue Bluebird ($299 - "street" prices), AKG C214 ($399), MXL 4000 ($200), Rode NT-1A ($230), Sterling Audio ST77 ($200). This is the one category where you may want to splurge a bit, and if the budget can be stretched, check out the Audio-Technica AT4050 ($700), Mojave Audio MA-201 ($700) and MA-200 ($1,100), AKG C414 XLS ($1,000), Neumann TLM102 ($700) and Shure KSM44A ($1,000).

Small diaphragm condensers:  Audio-Technica Pro 37 ($130), Shure PG81 ($120), Audix Fusion F15 ($110 each, $200 / pair), MXL 603S ($100) and Sterling Audio ST31 ($100). Moving up a bit in price and performance, the Audio-Technica AT4041 ($500 per pair) is also a good option.

Ribbons: Cascade Fathead II ($400 / pair), MXL R144 ($100). If the budget can be stretched, check out the Beyer M160 ($700) and Royer R-101 ($800).

Large diaphragm dynamics: E/V RE320 ($300), Audio-Technica ATM250 ($180), Heil PR40 ($325), Shure SM7b ($350).

Small diaphragm dynamics: Audix i5 ($100), Shure SM57 ($100), Audio-Technica ATM-650 ($100), Sennheiser E609 ($110), Heil PR22 UT ($115).

Small diaphragm dynamic "tom mikes": Heil PR28 ($150), Audix D2 ($130), Sennheiser  E604 ($140 each / $350 for a set of three).


THE ILLUSTRATED COLLECTION


The twelve microphones in Figure 1 are (top row) a pair of Audio-Technica AT4041 small diaphragm condensers ($500 / pair) flanking a Mojave Audio MA-300 ($1,300) multi-pattern large diaphragm tube condenser. Row two is a pair of Cascade Fathead II ribbon mikes ($400 for the pair with stock transformers), while row three shows a Shure SM57 ($100) and Audix i5 ($100) small diaphragm dynamics, Audio-Technica ATM250 ($180) and Electro-Voice RE320 ($300) large diaphragm dynamic mikes and three Audix D2 ($130 each) small diaphragm dynamic / tom mikes. Total cost for all of these mikes new would be $2,970.00, which is not insignificant by any means, but each of these mikes would be a useful addition to any mic locker, no matter how extensive. In other words, this isn't "cheap" stuff that you will eventually outgrow and no longer find useful; with proper care, good microphones can last for a lifetime. With this collection, or something similar, you have the foundation of a microphone collection that can handle a wide variety of tasks and serve you well for decades to come.


Phil O'Keefe is a multi-instrumentalist, recording engineer / producer and the Associate Editor of Harmony Central. He has engineered, produced and performed on countless recording sessions in a diverse range of styles, with artists such as Alien Ant Farm, Jules Day, Voodoo Glow Skulls, John McGill, Michael Knott and Alexa's Wish. He is a former featured monthly columnist for EQ magazine, and his articles and product reviews have also appeared in Keyboard, Electronic Musician and Guitar Player magazines.


--------------------------------------------------------------------------------------------------
Liked this? Then share this page and subscribe to get the top stories of the week, plus the most popular reviews delivered straight to your inbox.

And don’t forget to give us your suggestions in the comments!


View the original article here